
Collect and Manage Payments Directly Inside SharePoint
Modern organizations are constantly looking for ways to unify their business operations within SharePoint and Microsoft 365. For companies that use SharePoint to manage requests, registrations, or internal transactions, connecting payment processing with SharePoint has always been a challenge — until now.
With Infowise Ultimate Forms, you can integrate Stripe, one of the world’s leading online payment platforms, directly into your SharePoint environment. This allows you to create custom payment forms, automate receipts, track transactions, and connect everything to your existing lists, workflows, and dashboards — all without writing a single line of code.
Why Integrate Stripe with SharePoint?
SharePoint is already your central hub for managing data and processes, but native SharePoint does not handle financial transactions. By combining Stripe’s secure payment gateway with Ultimate Forms’ automation and form design features, you can build fully functional payment solutions directly inside your existing SharePoint sites.
This integration can support a wide range of business cases:
-
Collecting payments for orders, registrations, or bookings
-
Managing membership fees or event ticket sales
-
Accepting donations or application processing fees
-
Processing internal chargebacks between departments
-
Generating automated receipts and financial reports
The result is a seamless payment experience that keeps everything in one place — your SharePoint environment — while maintaining Stripe’s industry-leading security and reliability.
How Ultimate Forms Enables the Integration
Infowise Ultimate Forms provides all the tools you need to connect SharePoint with external services such as Stripe through no-code configuration. Instead of building custom APIs or Azure functions, you can set up automated payment workflows using modern forms.
Here are the key components that make this possible:
| Feature | Purpose | Example Use |
|---|---|---|
| Form Designer | Build modern, responsive forms with payment details, totals, and conditional logic | Add a “Pay Now” button or display calculated order totals |
| Automation Rules | Execute post-payment logic such as sending emails, updating statuses, or generating receipts | Update “Payment Status” to “Paid” after a successful transaction |
| Document Generation | Produce branded PDF invoices or receipts automatically | Create and email receipts after Stripe confirms payment |
| Associated Items | Manage line items or purchase details connected to a single payment record | Display order items under one payment transaction |
These building blocks allow you to design sophisticated payment workflows that feel native to SharePoint while maintaining full compliance and traceability.
Step-by-Step: Creating a Payment Form in SharePoint
Let’s walk through an example scenario — creating a Payment Request Form in SharePoint that collects payments through Stripe.
Step 1: Create a SharePoint List for Payment Requests
-
In your site, create a list called Payment Requests.
-
Add columns such as:
-
Customer Name (Person or Text)
-
Email (Text)
-
Amount Due (Currency)
-
Payment Status (Choice: Pending, Paid, Failed)
-
Transaction ID (Text)
-
Invoice Date (Date)
-
This list will serve as the main data source for tracking payment activity.
Step 2: Design the Payment Form with Ultimate Forms
-
Open the Forms Designer for the Payment Requests list.
-
Create a clean layout with grouped sections: “Customer Details”, “Payment Details”, and “Confirmation”.
-
Add validation rules to ensure all required information is provided.
-
Include a payment control and configure your Stripe settings. Include both Publishable and Secret key, copied from your Stripe admin center. The secret key will be stored securely in the backend and never exposed to the form users. Additionally select the Amount column and the Invoice ID column (where we will store the stripe invoice ID after payment).
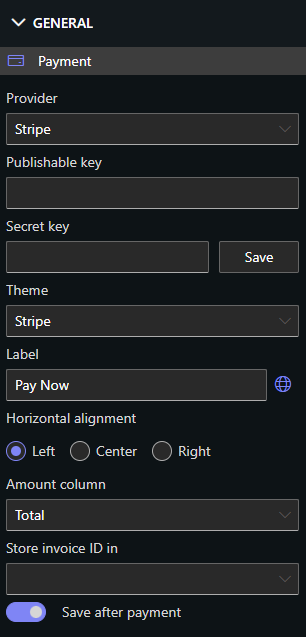
You can easily design the form to automatically calculate the total amount due based on other list data — for example, by summing related order items through the Associated Items feature. The summary column can then be picked as the Amount column.
Step 3: Configure External Form
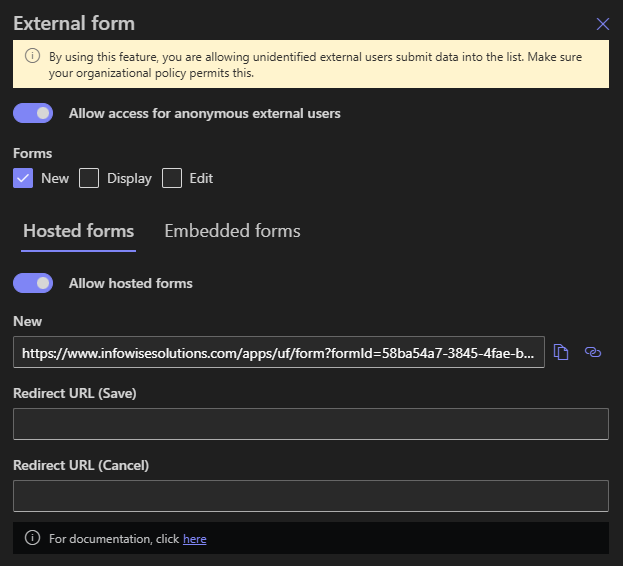
Ultimate Forms allows you to easily and securely expose your SharePoint form to external anonymous users. By leveraging the External Form feature, you can embed the form on your external website or simply provide a link to a hosted page. User will be able to submit data via the form, including payments, without having access to your internal SharePoint. The data will be saved directly into the SharePoint list, without any intermediaries.
Step 4: Handle Responses and Update Status
After the Stripe API confirms payment, Ultimate Forms' Actions can automatically update the related SharePoint item:
-
Set Payment Status = Paid
- Generate and send a receipt PDF to the customer using the Document Generation feature
-
Send an internal notification email to the finance or sales team
All of this happens instantly through configuration — no scripts, Power Automate flows, or third-party connectors required.
Step 5: Build Dashboards and Reports
With all payment data now stored in SharePoint, you can easily:
-
Create list views filtered by Payment Status (e.g., “Pending Payments”)
-
Display totals, counts, and KPIs using Indicators and Conditional Formatting
-
Build interactive dashboards using Charts
-
Export records for reconciliation or auditing
Since everything lives in SharePoint, finance, operations, and management teams can all access the same accurate information without switching systems.
Real-Life Scenarios
1. Event Registration Payments
A corporate event management team creates an internal registration system where employees or guests can register for workshops or conferences. Each registration generates a payment request. With Ultimate Forms, the form dynamically calculates the total based on selected sessions and then triggers a Stripe payment checkout. Confirmation emails and receipts are automatically generated and stored.
2. Sales Quote to Payment Workflow
A sales department uses the Sales Quote Generator solution from Infowise to prepare branded quotes. Once approved, the same record can be linked to a Stripe payment through Ultimate Forms. The system updates the quote’s status to “Paid” once the transaction completes, ensuring accurate financial tracking.
3. Donation and Fundraising Forms
Non-profit organizations can create donation pages inside SharePoint using Ultimate Forms’ public form option. Donors fill out the form, choose an amount, and pay securely through Stripe. The system automatically stores donor information, amount, and receipt ID for reporting and tax documentation.
4. Application and License Fees
Education institutions or municipalities often collect application or permit fees. Using Ultimate Forms with Stripe, applicants can fill out the required SharePoint form, pay instantly, and receive confirmation without manual processing — saving hours of administrative effort.
Security and Compliance
Because Stripe manages the payment itself, sensitive card data never touches SharePoint. Ultimate Forms only handles the communication between the form and Stripe’s secure API using encrypted HTTPS connections and tokenized identifiers.
This ensures compliance with PCI-DSS requirements while allowing your SharePoint application to function as the single interface for business operations.
You also retain full audit trails and version history within SharePoint, ensuring transparency for both IT administrators and finance auditors.
Advantages of Using Ultimate Forms
| Benefit | Description |
|---|---|
| No code setup | Configure integrations, rules, and automations entirely in the Ultimate Forms interface. |
| Full SharePoint integration | Payments are directly tied to your SharePoint items, lists, and workflows. |
| Automatic document generation | Produce branded invoices or receipts instantly. |
| End-to-end visibility | Monitor payment status, date, and transaction history from dashboards. |
| Secure architecture | Stripe handles the payment, ensuring PCI compliance and data security. |
| Scalability | Works for a single department or enterprise-wide payment portals. |
With these advantages, any organization using Microsoft 365 and SharePoint can bring e-commerce-grade payment capabilities into their intranet or business process portals.
Best Practices
-
Use test mode in Stripe first to validate API settings.
-
Always store and handle Stripe Keys securely.
-
Limit access to payment lists using SharePoint permissions.
- Create a “Finance Dashboard” view summarizing totals per month, department, or customer.
Summary
Integrating Stripe with SharePoint through Ultimate Forms opens a world of possibilities for digital payments and financial automation within SharePoint and Microsoft 365. Whether you’re processing event fees, sales orders, or internal cost recoveries, Ultimate Forms allows you to design professional payment workflows without code, without external connectors, and without leaving SharePoint.
With Stripe’s secure payment engine and Ultimate Forms’ intuitive configuration, you can give your users a seamless payment experience while maintaining full control and visibility across your organization.