In this post, I will show you how we can create Collapsible tabs and All Columns tab using Infowise Ultimate Forms in SharePoint Online Microsoft 365.
In the previous post, I have explains how to create Tabs with Tab Permission using Infowise Ultimate Forms in SharePoint Online Microsoft 365. And if you are new to Infowise Ultimate Forms, then you can download a trail Infowise Ultimate Forms and can check out the features. You can do lots of customizations and automate business processes using Infowise Ultimate Forms without using code or workflow in SharePoint Online Microsoft 365.
Read some of my previous Infowise Ultimate Forms tutorials:
- InfoPath alternatives for designing SharePoint Forms
- Infowise Actions vs SharePoint workflows
- Update Field Value without using Workflow by using Infowise Update Action
- Infowise Actions vs SharePoint workflows: Copy List Item easily using Infowise Action SharePoint Online
- Implement Date Validations using Infowise Ultimate Forms in SharePoint Online List Forms
- Team Leave Request Management Solution with Infowise Ultimate Forms
- ITSupport Ticketing System using Infowise Ultimate Forms
Here in this example, I am going to use the same Student Information SharePoint Online list. In that list, we are going to create collapsible tabs using Infowise Ultimate Forms. Open SharePoint Online list and click on Infowise from the ribbon and go to Infowise Ultimate forms, Click on Tabs and Tab Permissions from Configuration and Layout Permission section.
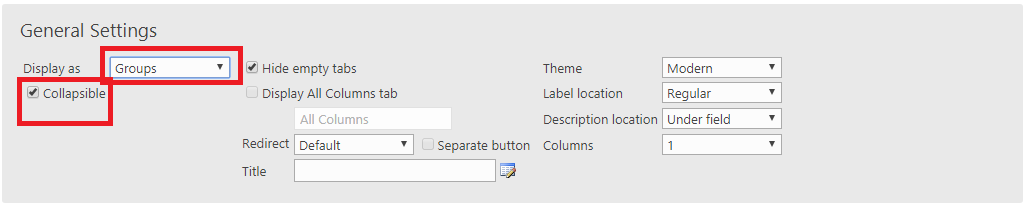
Next, go to the General Settings, select Display as “Groups” from the drop-down.
Below the “Display as“, tick on the checkbox “Collapsible“.
Next, Click on Save Button.
After applying collapsible Settings, see the below screenshot of Infowise Ultimate forms.
infowise ultimate collapsible tabs for Microsoft 365
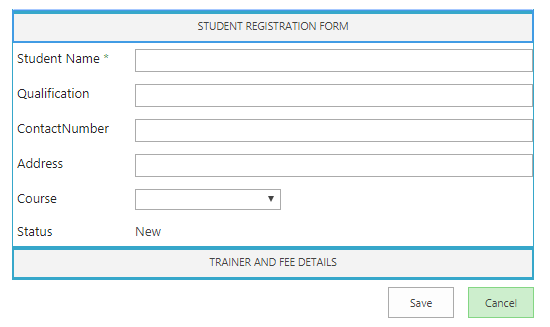
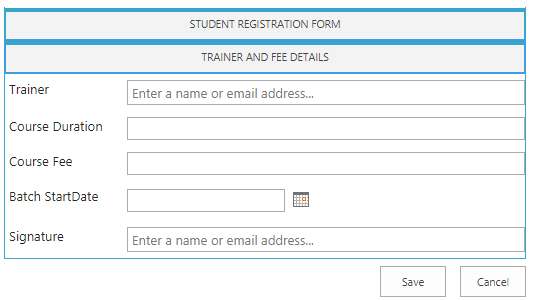
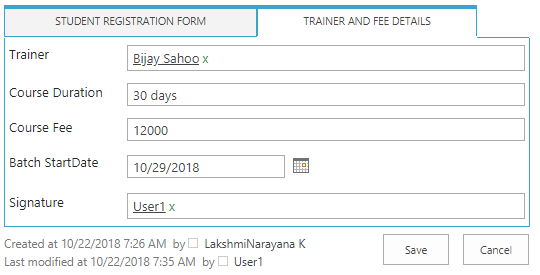
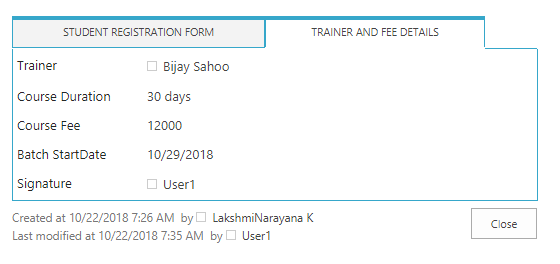
For the Trainer And Fee Details, click on the tab “Trainer And Fee Details”.
how to create tab permissions in infowise for Microsoft 365
Create “All Columns” Tab in Infowise Ultimate forms
Open SharePoint Online list and click on Infowise from the ribbon and go to Infowise Ultimate forms, Click on Tabs and Tab Permissions from Configuration and Layout Permission section.
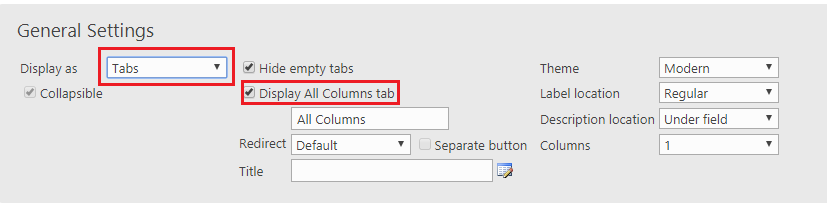
Next, go to the General Settings, select Display as “Tabs” from the drop-down.
Next, Tick on the checkbox “Display All Columns tab”.
Next, Click on Save Button.
infowise tab and tab permissions in Microsoft 365
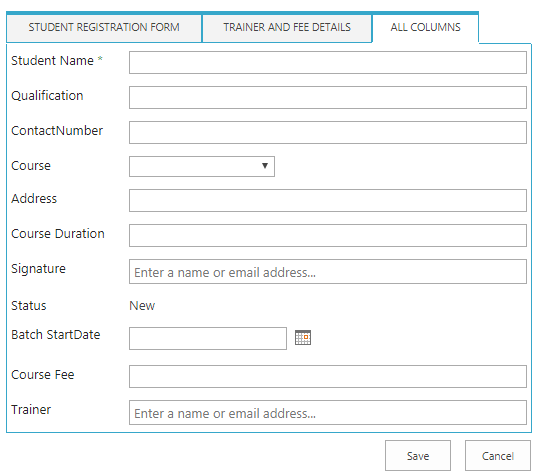
After changing Settings, see the below screenshot of Infowise Ultimate forms “All Columns” Tabs available.
how to create tab permissions in infowise for Microsoft 365
Step-1:
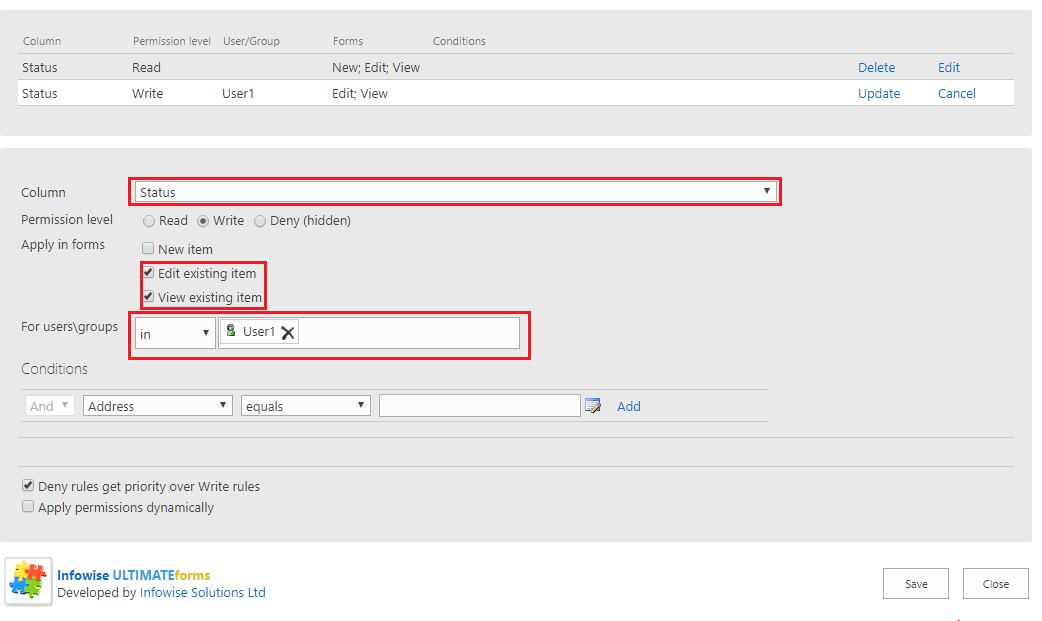
I have Added permissions to the Status column in Infowise Ultimate forms as shown below. Go to Configuration layout section, click on Advanced Column Permissions.
Select the column name from the drop-down which you want to apply for the permissions, select the permission level and other things. Click on the Save button as shown below.
how to create tab permissions in infowise for Microsoft 365
Step 2: Go to the Configuration Business Logic, click on Alerts as shown below.
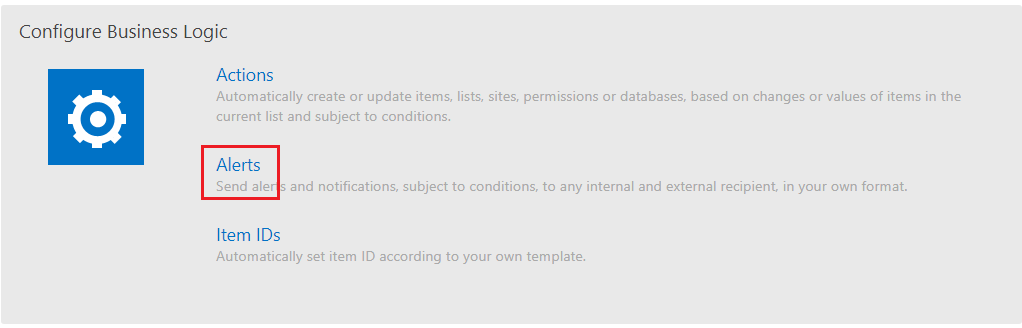
how to create tab permissions in infowise for Microsoft 365
Step 3: In Alerts, go to the general settings, enter Title, Select site from the drop-down and select list name from the drop-down as shown below.
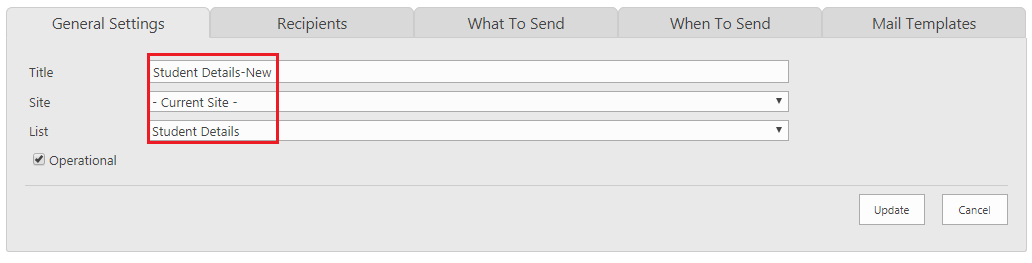
create tab and tabs permissions in Infowise for Microsoft 365
Step 4: Click on Recipients Tab, enter the “To” and “CC” to whom you want the send mail. In my example, I have chosen “User1” for “To” section and “Created By” for “CC”.
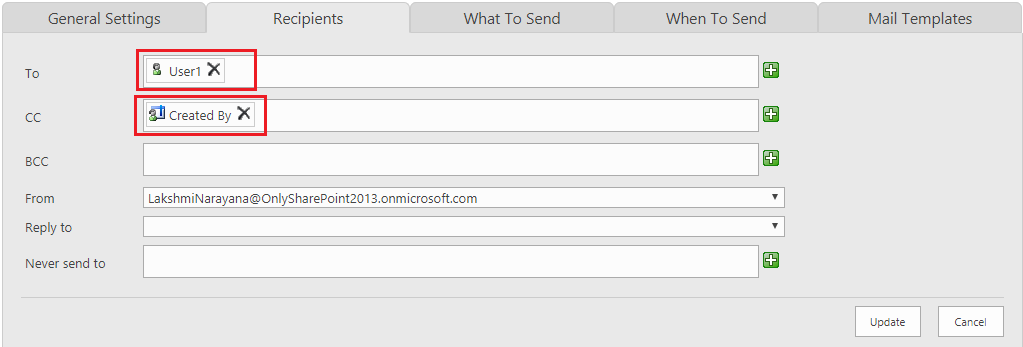
create tab and tabs permissions in Infowise for Microsoft 365
Step 5: Go to “What To Send”, go to Condition, select “Status always equal to New” as shown below.
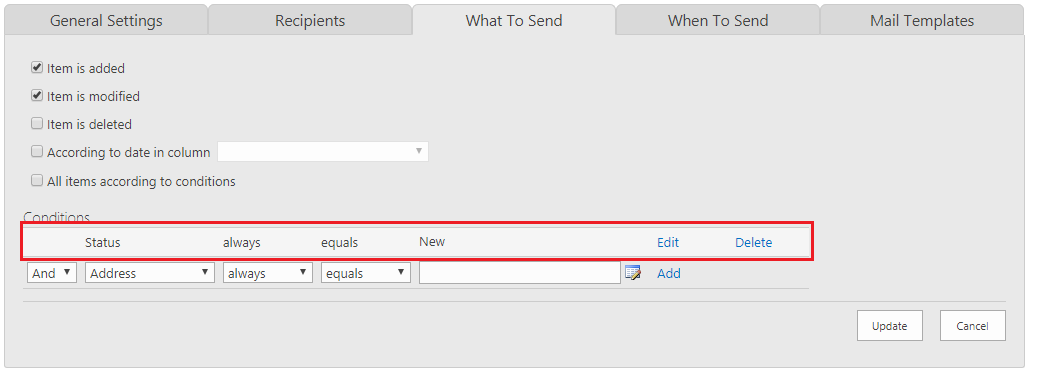
infowise tab and tab permissions in Microsoft 365
Step 6: Next go to the “Mail Templates” tab, Click on Add or Update the Template as shown below.
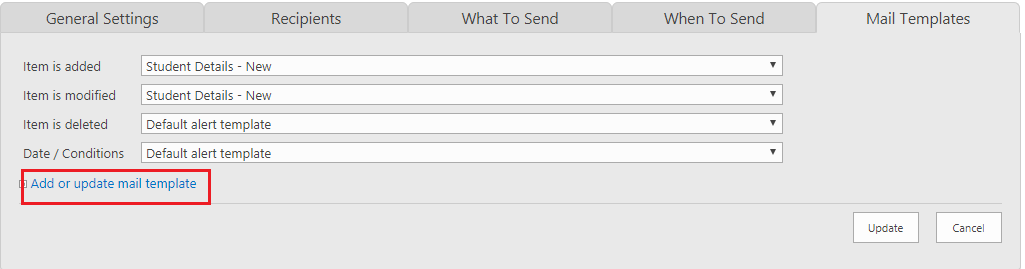
how to create tab permissions in infowise for Microsoft 365
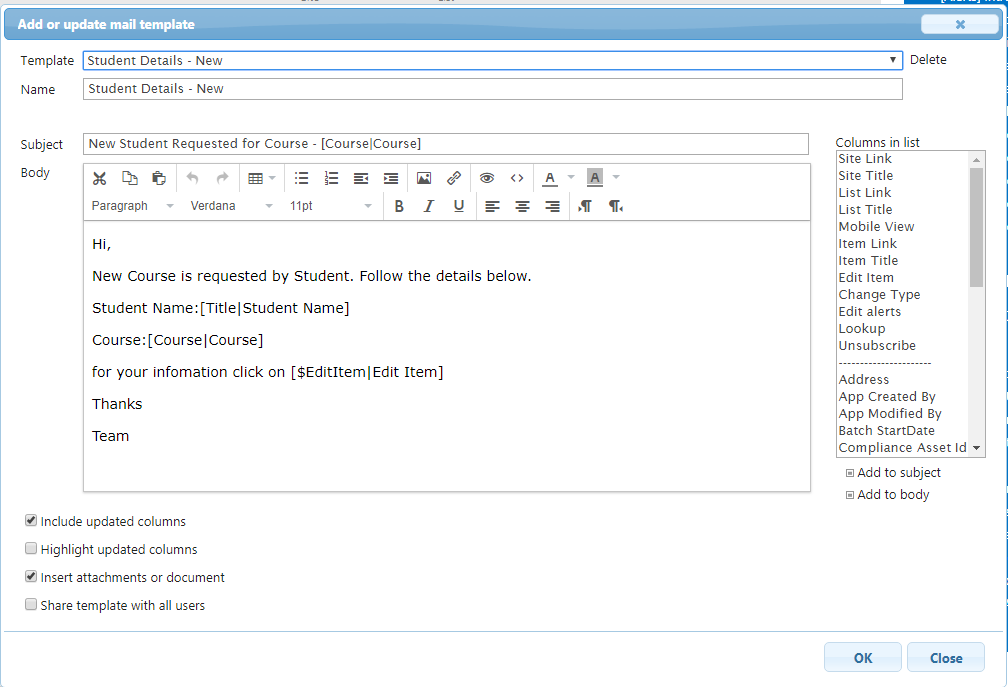
Step 7: Now Add or update mail template dialogue box is open, enter details and click on OK button as shown below.
how to create tab permissions in infowise for Microsoft 365
Step 8: Do the same things for the Status “Approval and Rejected”. See the below screenshot three alerts are created.

create tab and tabs permissions in Infowise for Microsoft 365
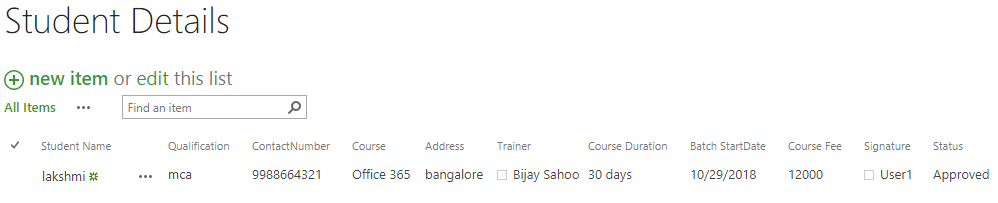
Step 9: Now go to your SharePoint List, add Student Details in infowise Ultimate forms as shown below.
- Trainer and Fee details tab will be Hidden. It will be available for the user who has permission to this tab.
- you find out Staus column is in Read mode.
how to create tabs in infowise for Microsoft 365
Test How Permissions works in List Forms customized using Infowise Ultimate Forms
Step 1: Now the item is added in the SharePoint list “Student Details” as shown below.
infowise ultimate tabs permissions Microsoft 365
Step 2: Admin(“User1′ is in our example) will get mail for the course request as shown below.
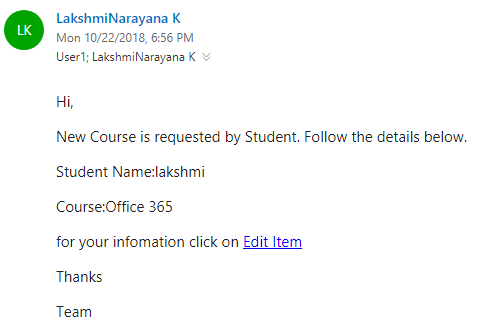
infowise ultimate tab and tab permissions in Microsoft 365
Step 3: Now Admin will go through the mail and Click on “Edit Item” in the mail.Ener the trainer name and fee details as shown below.
infowise ultimate create tabs for Microsoft 365
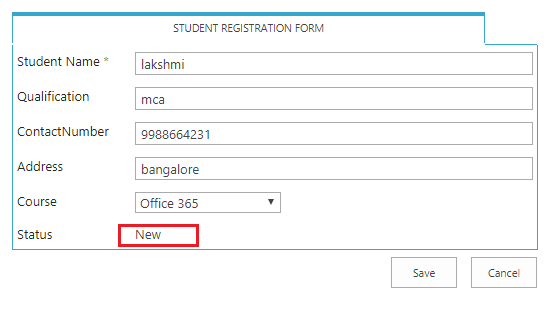
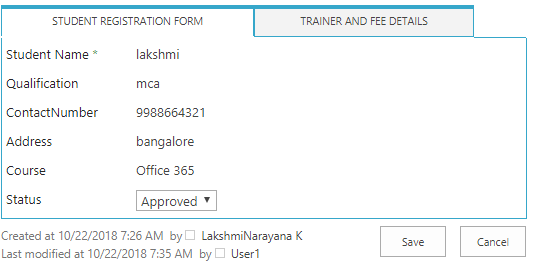
Step 4: Now go to “Student Registration Form”, change the Status to Approved and click on Save button as shown below.
infowise tab and tab permissions in Microsoft 365
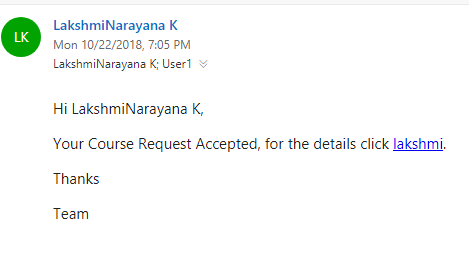
Step 5: Now Student will get the mail about the course details as shown below.
how to create tab permissions in infowise for Microsoft 365
Step 6: Student goes through the mail and clicks on link “Lakshmi” (student name) and will get the details as shown below.
infowise ultimate tab and tab permissions in Microsoft 365
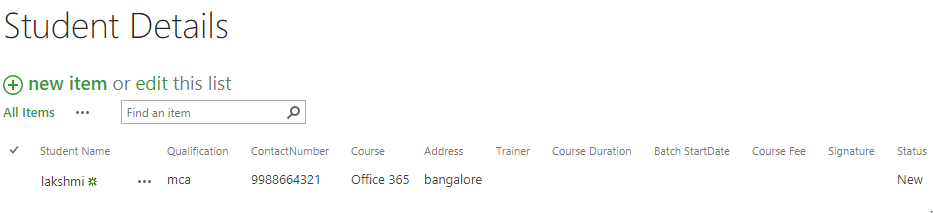
Step 7: Now check your list Student Registration Form and Trainer and Fee Details added in the list as shown below.
infowise tab and tab permissions in Microsoft 365
Conclusion:
In this article, we learned How to create the tabs, hiding the tabs, create the Collapsible tabs and All Columns tabs in Infowise Ultimate forms for Microsoft 365 in SharePoint online.
If you really like this try Infowise Ultimate Forms in SharePoint Online today.
Add your comment