Issue tracking is one of the most common business needs that organizations try to solve with SharePoint. And one of the most frequently overcomplicated. Teams end up with a dedicated ticketing platform that costs more than it should. It then requires IT to maintain, and sits outside SharePoint where all the other work happens. Or they try to build something in SharePoint themselves. Then they hit the limits of the native form experience, and abandon the effort halfway through.
The truth is that a functional, professional issue tracking system — with structured intake, automatic assignment, status tracking, notifications, escalation alerts, and a live dashboard — can be built in SharePoint in an afternoon by the administrator who manages the environment. No developer. No Power Apps. No external tool.
This is what that looks like with Ultimate Forms.
Why SharePoint Is the Right Starting Point
Before looking at the implementation, it is worth understanding why SharePoint is a genuinely good foundation for issue tracking rather than just a convenient one.
Every issue is a SharePoint list item. That means it is subject to the permissions model the organization already manages. It is searchable alongside everything else in the SharePoint environment. It can be referenced by other lists, linked to documents, and reported on without exporting anything. When an issue is resolved and archived, the record stays exactly where it should be. It is not locked away in a third-party database that requires a separate export to retrieve.
The limitation has never been SharePoint itself. It has been the form and automation layer on top of it. That is exactly what Ultimate Forms provides.
What a Complete Issue Tracking System Actually Needs
A useful issue tracker has a small number of essential components. Getting them right is more important than adding complexity.
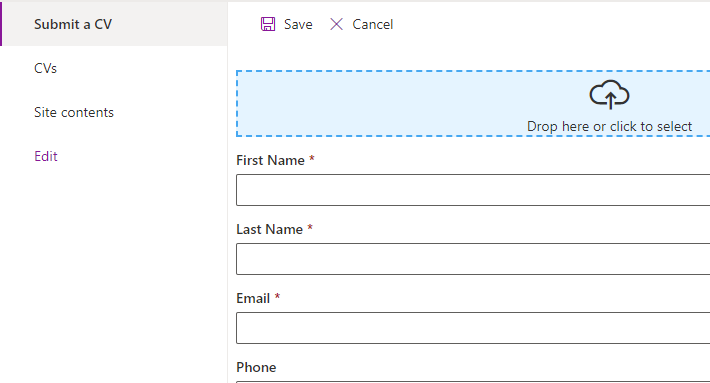
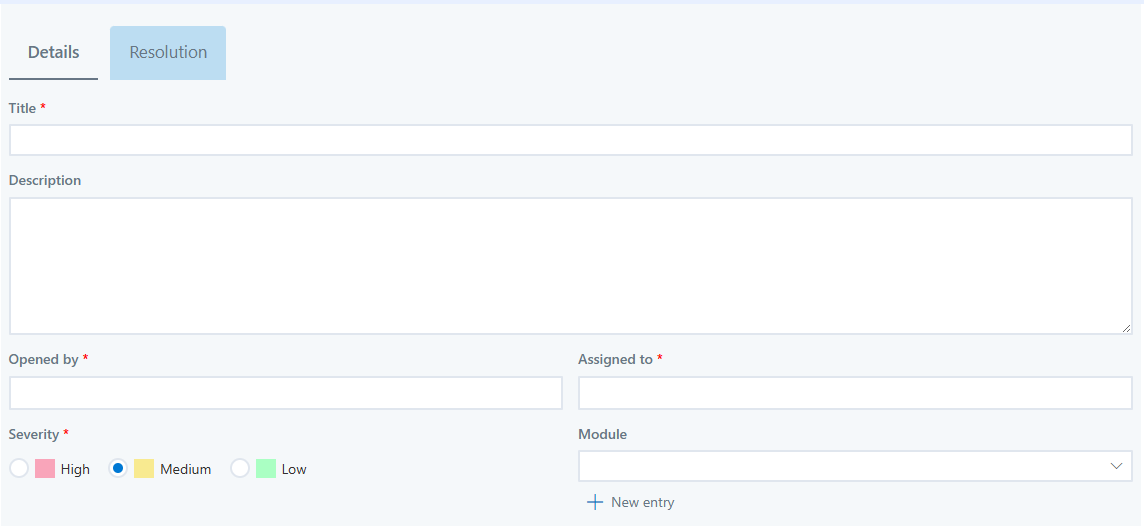
Structured intake. The person submitting an issue should be guided through a form. The form captures everything needed to act on the issue without follow-up. Category, priority, description, affected system or area, and relevant attachments — all collected in a consistent format from the first submission.
Automatic assignment. The issue should reach the right person or team immediately. Manual routing creates a bottleneck and delays resolution.
Status tracking. The issue should move through defined stages — New, In Progress, Pending, Resolved, Closed — with visibility at each stage for both the submitter and the team handling it.
Notifications. The submitter should know when their issue has been picked up. The assignee should know when a new issue arrives and when a deadline is approaching. The manager should know when an issue has been open too long.
A live queue view. The team handling issues should be able to see the current state of everything at a glance — what is open, what is overdue, what is waiting on a response — without opening individual records.
All of these are deliverable in Ultimate Forms without writing code.
Building the System: Step by Step
Step 1 — Design the Intake Form
The intake form is the entry point for every issue. In Ultimate Forms, the Form Designer opens in the browser. Columns from the SharePoint list are arranged into a structured layout, organized into sections, and given conditional logic where needed.
For an IT help desk, the form might use tabs to separate the submission details from the resolution notes — with the resolution tab visible only to technicians. For a facility management tracker, the form might show additional columns when the category is Safety, requiring a location and a severity rating that are not relevant to general requests.
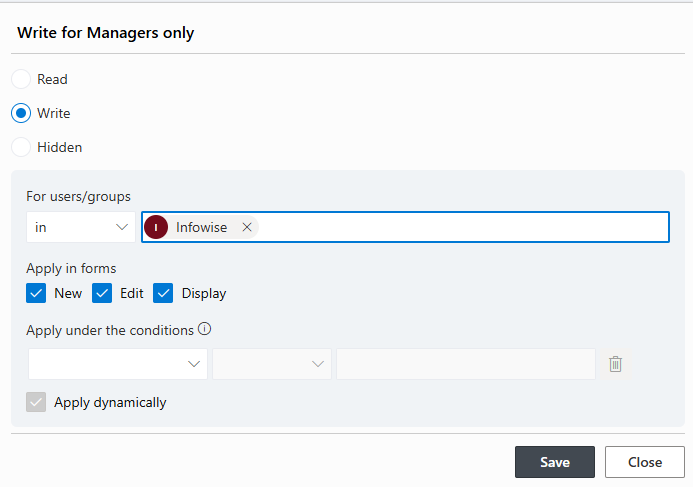
Conditional visibility, required column rules, and column-level permissions are all configured in the same interface. The form that a user sees when they click New is the fully configured result — not the flat list of columns that native SharePoint provides by default.
Real-world example: A manufacturing operations team configured their maintenance request form to show different column sets based on the equipment type selected. Electrical faults triggered different columns than mechanical failures. The form adapted in real time as the user completed it, reducing incomplete submissions that previously arrived without the information the maintenance team needed to respond.
Step 2 — Configure Automatic Assignment
Once a ticket is submitted, Ultimate Forms automatically evaluates the category or team column and writes the appropriate assignee to the Assigned To column.
Software issues go to the software team lead. Network issues go to infrastructure. Facilities requests go to the facilities coordinator. The assignment logic is a condition in the action configuration — if Category equals X, set Assigned To to Y.
This takes approximately two minutes to configure for a standard help desk scenario. When a new team or category is added, you might not even need to make any changes to any business rules.
Real-world example: An HR team configured their policy query tracker to assign issues by department. HR questions went to the relevant HR business partner, payroll questions to the payroll team, and benefits questions to the benefits coordinator. Before the system existed, all queries arrived in one shared inbox and were manually forwarded. Resolution time dropped significantly within the first month.
Step 3 — Add Status Tracking with Role-Based Views
The Status column is the backbone of the tracker. Configured with managed values — New, In Progress, Pending User Response, Resolved, Closed — it gives the team a consistent lifecycle to work within.
Column-level permissions in Ultimate Forms control who can update the status at each stage. The submitter cannot change their own ticket from New to Resolved. The assignee can move it through the workflow. The manager has full visibility of the record.
Color-coded list views make the queue immediately readable. Open tickets appear in one color, overdue in another, resolved in a third. The team lead scanning the queue at the start of the day sees the state of everything in seconds.
Step 4 — Set Up Alerts and Escalation Notifications
Unanswered issues are the most common failure mode of any tracking system. Ultimate Forms Alerts address this with scheduled, condition-based notifications that fire without any manual intervention.
An alert configured to fire eight hours after creation — when status is still New — sends a reminder to the assignee. If the ticket remains open after 24 hours, a second alert notifies the team lead. A third alert at 48 hours can reach the service manager.
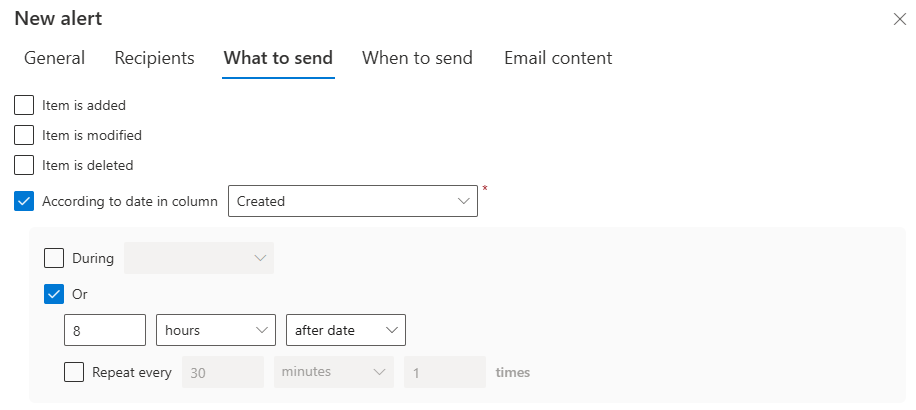
Each notification email is fully customizable. The assignee's alert includes the ticket title, category, priority, creation time, and a direct link to the record. The email tells the recipient exactly what they need to know and where to go. There is no searching for the ticket in SharePoint.
Real-world example: A financial services firm configured their internal request tracker with a two-stage escalation. Requests unanswered after four business hours triggered a reminder to the assignee. Requests unanswered after eight hours triggered a notification to the department manager. Average resolution time decreased, and escalation-related complaints to management dropped to near zero within six weeks.
Step 5 — Build the Dashboard
The final component is visibility for management. A SharePoint page with Ultimate Forms counter web parts gives the team and their managers a live view of the queue — without exporting anything to Excel and without connecting Power BI.
A counter for open tickets. A counter for tickets assigned to each team member. A counter for tickets open more than 24 hours. A counter for tickets resolved this week. Each counter is configured by pointing it at the SharePoint list with the appropriate filter — a five-minute task per counter.
The dashboard updates automatically as tickets are created, updated, and resolved. There is no refresh button. There is no report to run. The current state of the queue is always visible on the page.
Starting From a Template
For organizations that want a head start, the Ultimate Forms Solution Catalog includes ready-to-use issue tracking templates — Issue Tracker, Bug Tracker, Customer Complaint Resolution, and others — each installed with a single click. The list structure, form configuration, views, and automation logic are already configured.
The administrator installs the template, reviews the configuration, and customizes what needs to change for the organization. A system that would take a day to build from scratch takes a fraction of that time from a template starting point.
The Realistic Timeline
A basic issue tracking system — structured intake, automatic assignment, status tracking, email notifications on submission and resolution — can be configured in two to three hours by a SharePoint administrator with no prior Ultimate Forms experience. A more complete system with escalation alerts, role-based views, color-coded status columns, and a live management dashboard takes a day.
That is not a description of a minimal prototype. That is a production-ready system that real teams use.
The organizations that benefit most from this approach are those that have been managing issues in email, or that have been paying for a separate platform to do something that SharePoint — with the right tool on top of it — does just as well for less.
The IT Service Request template and over 440 other ready-to-use SharePoint solutions are available at infowisesolutions.com/solutions. A free 30-day trial is available at infowisesolutions.com/installer/uf.
Add your comment