Saleforce connection allows you to add, view and update records in your Salesforce org through forms hosted in SharePoint, on a hosted page or on your own page.
NOTE: currently, you cannot embed the forms directly in Salesforce, this functionality will be offered in the future.
To connect to Saleforce data, you need to perform the next general steps:
- Configure Ultimate Forms as a Connected App within Salesforce
- Configure external data connection in Ultimate Forms, connect to Salesforce and select your object. Optionally, you can configure some of the field settings.
- Design a form in Form Designer based on the data connection
- Optionally, embed the form in your own page
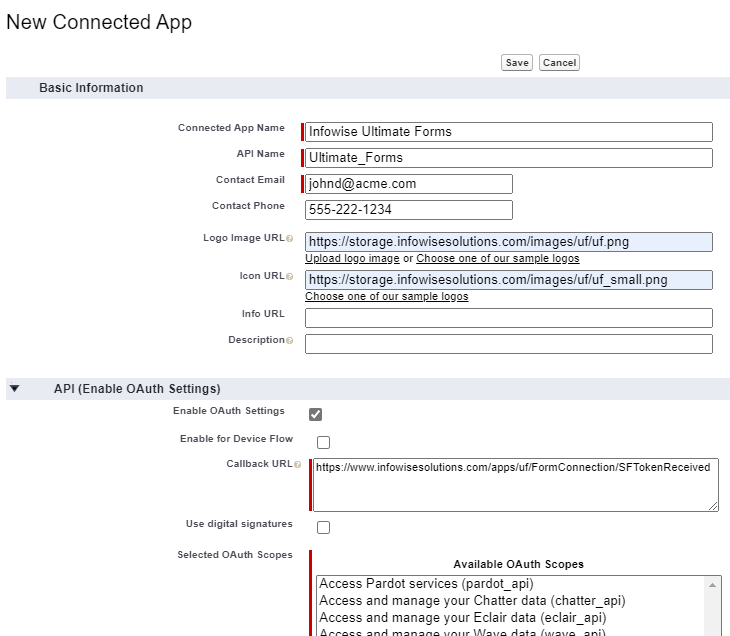
Configure Connected App
Connected App configuration allows Ultimate Forms to have access to Salesforce data. Within this configuration you grant the required permissions and generate app's Consumer Key and Consumer Secret (credentials with which Ultimate Forms will log into Salesforce).
- Log into Salesforce with your browser
- Click on Setup in the top right corner
- In the left-side menu, under Platform Tools, open Apps, then click on App Manager
- In the top right corner click on New Connected App
- Enter the following property
- Connected App Name: Infowise Ultimate Forms
- API Name: Ultimate_Forms
- Contact Email: enter your email
- Contact Phone: optionally enter your phone number
- Logo Image URL: https://storage.infowisesolutions.com/images/uf/uf.png
- Icon URL: https://storage.infowisesolutions.com/images/uf/uf_small.png
- Mark Enable OAuth Settings
- Callback URL: https://www.infowisesolutions.com/apps/uf/FormConnection/SFTokenReceived
- Selected OAuth Scopes:
- Access and manage your data (api)
- Perform requests on your behave at any time (refresh_token, offline_access) - this is only required if you plan to create anonymous forms, read more below.
- Click on Save
- You are now returned to App Manager and can see the new app in the list
- Click on View in the context menu on the right
- Note Consumer Key and Consumer Secret values, you will need them to create your external data connection
- In the left-side menu click on Settings -> Security -> CORS
- Add https://www.infowisesolutions.com as Allowed Origin. It will ensure Ultimate Forms is allowed to fetch data from Saleforce
Configure External Data Connection
External data connection contains the configurations needs to connect to your data and generate a suitable form.
- Open Ultimate Forms
- Click on External data connections
- Click on Add new profile
- Enter a user-friendly title (it will be visible to users) and switch type to Salesforce
- Specify which kinds of forms you want to support
- View - grid view of existing items (we recommend using paging if there is a large number of items)
- New - create new items
- Display - view existing items
- Edit - edit existing items
- Enter Consumer Key and Consumer Secret of your Connected App
- Click Connect
- A pop-up window requesting your Salesforce credentials will open, log in to continue. Note that the pop-up window is hosted by Salesforce itself. Ultimate Forms will never ask for your Salesforce credentials.
- Select your Salesforce object, then select a view
- Toggle Require users to log in
NOTE: To prevent any authentication problems, use a separate Connected App for authenticated and unauthenticated profiles.
- Off - users submit data anonymously, without logging in. Suitable mainly for external data collection form open to the general public (for example, sign up for a newsletter)
- On - users have to log into Salesforce (in a pop-up window) when viewing, adding or editing items. All operations are conducted under the identity of the logged-in user. This is the recommended setting for most scenarios
- Click on Advanced field configuration to view the fields in the object and make changes to their settings
- Under Access Control configure how your form will be access (hosted page, your own page) and register URLs of your pages that embed the form
- Save your profile. You are ready to design the form
Design Form
Click on the Design form icon for your new profile. You will be taken to Form Designer and asked whether you want to start with a blank form or auto-generated form. The actualy design of the form is the same as any Form Designer form, refer to the general Form Designer documentation for further details.