
(By Garrett Curtis)
Recently, when extending an existing SharePoint site with Infowise Ultimate Forms I was faced with the need to integrate Custom Content Types with Infowise Ultimate Forms. Thankfully these two tools work very nicely together and, when combined, produce some very powerful configuration options. In this article, I will briefly cover the purpose of content types, and explain how to setup a simple list combining custom content types with Infowise Ultimate Forms.
Content Types are SharePoint’s out of the box method of segregating items in the same list into separate “types”. For example, in the default “Documents” library crated with every new SharePoint site, clicking the “New” button will bring up a list of different document types (Word, Excel, PowerPoint, OneNote, etc...) which can be created in the library.

This method can also be used in a normal list; one example is an IT Helpdesk where users can submit different types of requests (hardware request, software issue, new employee setup). In this case, the requests share some properties (requestor, time, priority) but also have properties that are unique to each request type. Creating custom content types for each of these request types allows you to utilize one central list in SharePoint that behaves like multiple lists!
Infowise Ultimate Forms allows you to compliment having multiple content types in the same list by specifying rules for specific content types. With this methodology, you can turn one list into a fully featured business tool such as a helpdesk, project tracker or sales system. To get started with custom content types, create a new custom list in SharePoint and follow these steps:
- In List Settings for the new list, select "Advanced settings", the first option in Advanced Settings is to "Allow management of content types", change this to "Yes" and then press "OK" to exit the Advanced Settings page.
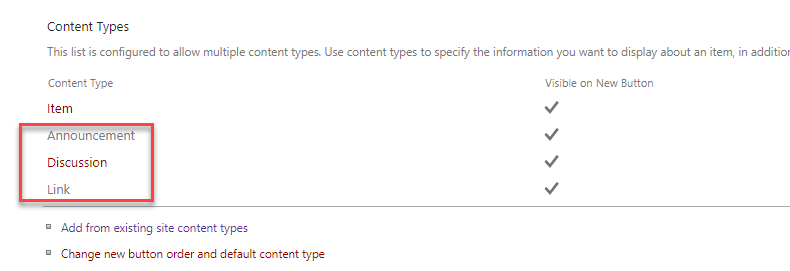
- Now in List Settings, you should see a new section "Content Types". This section is where you will manage the content types for the list.
- Select "Add from existing site content types" from the List Settings page to see a list of all the defined content types available in the site.
- Each of these content types has a series of predefined columns that will be added to the list when you add the content type. You can create your own custom content type with your own column layout by following these instructions:
- Double click each of the following content types to add them to the "Content types to add" box: Announcement, Discussion, Link. Press "OK" to return to List Settings.
- Now you will see each of these content types has been added to the "Content Types" section of the List. Clicking on one of them will take you to the List Content Type settings page which lists the columns associated with that content type. Here you can also add or remove columns to further customize the content type.
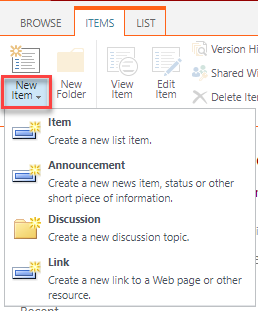
- Exit from List Settings and return to the new list, from the ribbon, select "Items" and then click the "New Item" text to see each of the content types that can be added to the list.
- Try creating each of these content types and notice that each one presents different columns.
Now we will add Infowise Ultimate Forms customization which behaves differently for each Content Type. For this example, we will be setting up an email alert to go out when a new Announcement has been added.
- From the ribbon, select "List" and then "Design" to enter the Infowise Design screen.
- Click "Alerts" under the "Configure Business Logic" section to enter the email alert configuration section
- For this alert, we will set "What To Send" as follows:
- Only check “Item is Added” so that the email only sends when a new item is added to the list.
- For Conditions, create a condition for the Content Type that always equals Announcement
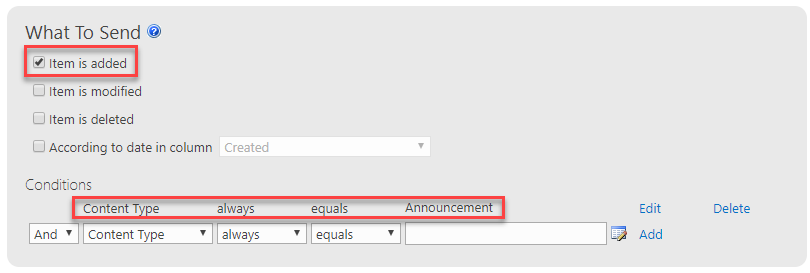
- Click Add to add this alert to the system.
Now every time a new Announcement is created, you will receive an email alert. You can configure the email alert to go to different recipients or to have a custom body by following the instructions on the Infowise training page:
https://www.infowisesolutions.com/training/article.aspx?ID=55
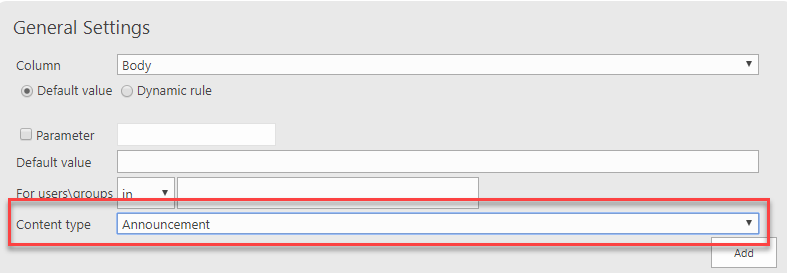
All the Infowise features can be configured to act differently for different content types, either using conditions as shown in the Alerts, or with a specific Content type dropdown like the Default Values section shown here (note that in this case, leaving Content type blank will create the rule for all content types).
Now that you have seen the power of Custom Content Types and Infowise Ultimate Forms, I challenge you to integrate these tools into your next SharePoint list!