Introduction
Using the Actions component of Ultimate Forms you can easily implement sophisticated business logic without the unnecessary complexity of traditional workflows.
- Actions are easy to configure.
- They require no deployment. By simply saving an action, you are already allowing to start running.
- You can add and modify actions gradually over the course of your solution's lifecycle. This way you don't have to foresee future needs and requirements.
Actions can do almost everything inside and outside SharePoint:
- Create/update items
- Manage permissions
- Interact with line-of-business applications
- And much more
The way actions are implemented and what sets them apart from traditional workflow solutions is that each action is basically on its own. Different actions in the same list almost never interact with one another. Each action contains everything it needs to run.
No need to design a flowchart ubiquitous in all workflow products. You just configure when this particular action needs to run based on triggers and conditions, and it will do its work. Simple.
Actions can start executing in a variety of ways:
- Responding to list item events (such as item being created, modified, deleted, etc.)
- Timer-based (such as run 2 days before the Due Date or every Friday)
- Manually by users.
Actually, the same action can even have multiple triggers.
Run Actions in Sequence
In some cases you want several actions to run at the same time. For example, closing a project consists of updating its status and also sending an email to the supervisor.
Normally with actions, your actions will run in sequence when both of the following apply:
- You set them to run on the same event
- They have the same conditions.
But if you prefer to trigger them manually with a single click? Or you might not want to add complex conditions over and over again.
Enter Action Group
This action type is there to trigger other actions. It can have its own triggers and conditions. Once you execute it, it will execute its referenced actions in the specified sequence. I'm sure you will find this action easy to configure and use.
Walkthrough Demo
In this demo, we will build an action group that will perform all the necessary steps of closing a project. This is of course a simple demonstration of what the action group can do. You can use them to create much more advanced solution with ease.

In our example here we have 3 actions:
- Complete project - our action group, it can be executed by editing the item or manually
- Update status - updates the item status, has no triggers, can only be executed through an action group
- Notify manager - sends an email, also can only be executed through an action group
Configuring the Action Group
First we will examine how we configure our action group action.

Under General settings we specify the action name and description. I recommend to always give meaningful names to actions, it will help you and, with manual actions, your users.
Under When to execute we specified Item is modified. This way the action will automatically run when an item is updated. We can also add conditions to only run the action when certain changes occur. I will not be covering this functionality in this particular blog.
We can also specify Manual execution for the action. That means that users will be able to trigger it manually from a button.
Under the Advanced settings tab you will notice that the Impersonation option is not available. This action type doesn't support impersonation (because it doesn't actually do anything with any SharePoint list items). But the actions attached to it can use this option, depending on their requirements. It gives you precise control over what action can do what.

Action Settings
Under Action settings we can attach other actions to the action group and set their order. Order is important as it allows you to stop execution when one of the actions fails. You do that by checking the Halt execution on failure checkbox on the Advanced settings tab.
For instance, if your action group is supposed to move an item to the archive list, it will include two actions:
- One that copies the item
- Another one that deletes the original item.
Obviously, you don't want to delete the original item if the copy action failed.
Let's Test it out
And that's it, now when we execute the action group action, it will execute all the attached actions automatically.

Let's execute the action manually. You simply click on the Run Actions button in the list toolbar, then click on the action itself. You can also trigger the action from a button you place on your form directly.
Once it's done, the action will display its execution result:

As you can see, it shows the names of the action it executed and any messages they returned. In this case it all went well and there were no messages of any kind.
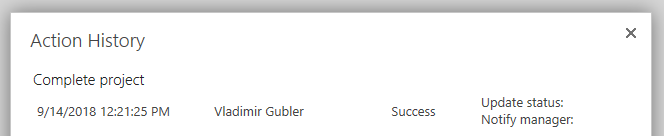
If you enabled it, you can also see the result in Action History:
Execution Looping
Another powerful, but probably not a very well-known feature of action groups is the ability to loop through values in a certain interval. The interval could be two dates or two numbers. The action group will then execute the associated action once for each value within the interval, passing that value as a parameter to the action. For example, you can easily create tasks for each day within the interval period, with just one action!
Additional Consideration Points
A couple of points that you need to be aware of:
- As I mentioned earlier, Impersonation is set on per-action basis. Impersonation allows users with insufficient permissions to execute actions that require higher permissions. For instance, this way a regular user might be able to set permissions on list items.
- Attached actions can have their own conditions. The action group will check those during the execution. Actions that do not pass their conditions will not execute. The action-specific conditions are in addition to the conditions on the action group itself. These control whether or not the action group itself is triggered.
- Actions can be a part of zero, one or several action groups. You can use action groups to bundle conditions together. Actions that are a part of an action group can also have their independent triggers and be executed on their own, independently from the action group. You have the full flexibility to decide how you want to implement it!
Conclusion
Action groups are a power addition to your digital toolbox. They allow you to bundle together a number of different actions. Users are then able to execute all these actions in a single step.
Add your comment