
Filters in Print with Infowise Ultimate Forms: Fine-Tuning What Gets Printed
Printing list views, records, or calendar events from SharePoint is often necessary—for reporting, sharing, compliance, or offline review. But usually, you don’t want everything in the list; you want to print only relevant items. That’s where filters in print templates with Infowise Ultimate Forms become invaluable. They let you define exactly which records should be included in a print or export, under what circumstances, and how the output looks.
Below I’ll walk through what filtering in print templates means, how it works in practice, options available, and examples of how organizations use these capabilities to streamline document output, reporting, and batch printing.
What “Filters in Print” Allows You to Do
In Ultimate Forms’ Print component, when you create templates for printing list data (or calendar-based items), you can define conditions or filters that determine which items are included in the print output. This is particularly helpful when you want to:
-
Exclude certain items (e.g. draft, cancelled, status-pending)
-
Include only items matching some date range, or other column criteria
-
Apply additional filters beyond what the SharePoint view already shows
-
Print only what is needed rather than cluttering with irrelevant data
You can use filters in List-based print templates and Calendar-based print templates. The filters work in conjunction with any view filters on the list—so they further narrow what gets printed. That means even if someone has applied a filter in the view, your print template can impose its own additional logic.
Key Filter Options & Capabilities
Here are the main filtering features you will have when configuring print templates with Infowise Ultimate Forms:
Column Conditions
You can specify one or more conditions based on list or calendar item columns. Common columns used include status, date, category, or any custom column. For example:
-
Only include items where Status = Approved
-
Only items with Due Date ≥ Today
-
Items from a specific Department value
These conditions let your print templates be selective.
Combining Filters
Filters can be combined so more than one condition must be met (logical AND) or alternative conditions may be allowed (logical OR, depending on what the template setup allows). This yields more granular control—for instance, print items that are either high priority or past due, etc.
View Filters + Template Filters
Because print templates respect both the existing filters of the list view and whatever you configure in the template, you get layering of filters. So even if a user is viewing the list only by a certain department, the print template may add a restriction on status or date.
How to Configure Filters for Printing in Ultimate Forms
Here’s a practical walkthrough for setting up filtered print templates.
-
Choose or Create a Print Template
Start by opening Print in Ultimate Forms for your list by clicking on Design -> Print and Export. Create a template (or edit existing). Choose a List-based (printing multiple records/rows) or Calendar-based as opposed to Item-based (single record). Item-based templates cannot be filtered as they are only intended to print single or manually picked multiple items. -
Identify Columns to Include
Decide what data you want to show by selecting the columns to include. You can also opt in to simply include the column in the selected list view. - Provide header and footer
You might want to create your own header and footer to give your print-out official corporate design. - Save the template
Give the template a unique, easily recognizable name and save.
Next, go back to the list view and click on Print in the command bar to bring up the print preview pop-up.
-
Select Print Template
If your list has more than one print template, select the one you want to use. -
Open Filter Settings
Beside the template selector, you will find a filter button that opens the filter section. -
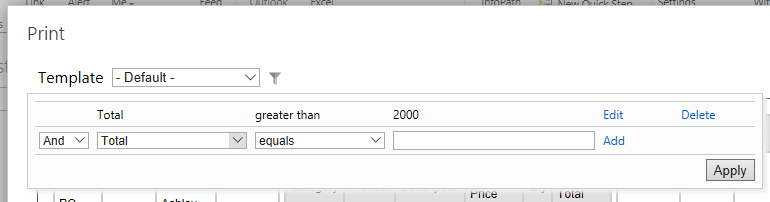
Define Conditions
Add one or more filter expressions. Choose the column, operator (equals, greater than, less than, contains, etc.), and a value. For example, “Status equals Approved” or “Date greater than 2025-01-01”. - Test Print Preview
Verify that only the intended records appear, formatting is correct, headers/footers look good, and dates etc. correct. -
Export, Print or Email
Next you can print or export (to PDF, Word, Excel) or email data directly or as a PDF attachment.
Real-World Use Cases of Filters in Print
Here are illustrative examples of how different organizations use filtered print templates to solve common business needs.
Use Case A: Finance Department – Expense Report Summaries
A finance team wants to generate monthly expense reports for each department. They set up a list of expenses with many statuses (Draft, Submitted, Approved, Rejected). For official printouts, they define a print template based on a view where the filter is “Status = Approved” and “Date in Previous Month.” The template prints only approved expenses for the relevant date range, excluding drafts or rejected ones, ensuring they send clean, audit-ready reports to management.
Use Case B: Project Management – Task Overdue Alerts
Project managers want a weekly printout of tasks overdue. They have a task list with due dates and completion status. They define a print template based on view with filters: “Due Date < Today” and “Status ≠ Completed.” Each week, the manager prints out tasks that are past due and still uncompleted. This helps focus attention and track missed deadlines.
Use Case C: Compliance / Auditing – Restricting Sensitive Data
An organization has a list where some items are flagged as “Sensitive = Yes.” For compliance or data privacy, when printing for external audits, they want to exclude these sensitive items. Using view filters in the print template, they ensure sensitive records are not included in exported PDFs sent to external parties, even though those records may still appear in internal SharePoint lists.
Use Case D: Customer Feedback or Support Tickets
Support teams often want to print feedback/ticket lists filtered by severity or status to distribute in meetings. With filters, they define print templates that only include high-priority tickets or those marked “Needs Escalation.” This enables sharper reporting focused on what matters most, rather than printing long lists of resolved or low-priority tickets.
Use Case E: Calendar-based Filtering
Organizations keep logs of events or inspections. For printing calendar-based templates (for example, monthly view), filters help choose which events to include—maybe only those of a certain type or in a specific category or location. For example, “Event Type = Safety Inspection” and “Event Date in Current Month”. This gives clean, focused calendar reports.
Advanced Tips & Best Practices
To get the most from filtering in print templates, here are some advanced suggestions and strategies many users find helpful.
-
Use Dynamic Conditions – Where possible, instruct users to enter their own dynamic conditions. That way, a generic template can adapt based on the current ad-hoc requirements.
-
Minimize Unnecessary Print Data – Printing fewer, more relevant columns keeps output compact and easier to review. Use filters to avoid including irrelevant or obsolete records.
-
Optimize for Layout & Design – Filtered printouts look more professional if layouts, fonts, and colors are clean. Use features like high contrast themes or header/footer settings.
-
Maintain Print Templates Over Time – As your lists evolve (new statuses, columns, workflows), review your print templates and filters. An old filter may reference a column that no longer exists or use outdated status values.
-
Permissions & Visibility Integration – Use column/tab permissions so that print templates only include data the user has the right to see. Filters should not expose data users are not permitted to view.
-
Batch & Scheduled Print Actions – Use filter-based print templates combined with Actions to generate printed reports on schedule (weekly, monthly), or to email filtered data to stakeholders automatically.
-
Consistent Naming & Documentation – Name your print templates clearly (e.g. “Approved Expenses – Month End”, “Overdue Tasks Weekly Report”) so it’s obvious what filters are in use. Document which filters are used for each template to aid maintenance.
Summary
Filters in print templates with Ultimate Forms give you fine-grained control over which items are included when you print, export, or email data. They help you avoid clutter, protect sensitive information, make outputs relevant, and deliver cleaner, more useful reports. By combining filter conditions with templates, preview/testing, and good layout, you get print outputs that serve a purpose—not just printouts of everything.