
Introduction
The Actions component of Ultimate Forms provides an easy alternative for SharePoint automation. Unlike traditional workflows, such as Power Automate or SharePoint Workflow engine, it is much more approachable for non-developers.
Actions offers a wide selection of action types. These help you to automate tasks both inside and outside SharePoint. Actions are easy to use. Just create and configure an action, specifying when it runs and what it does. Once saved, it's ready to run.
Introducing Loops
I this article I would like to focus on the loop functionality of the Actions component of Ultimate Forms. Using loops you are able to execute a single action or a group of actions several times, based on a range of numbers or dates. And you do that while passing the current value of that number/date to the action. The action can then use it for value assignment, as part of expressions/function or even in conditions.
For example, given Start and End date, the action will execute for each date in the interval.
Let's Try It
In my example I'm automating setting up a set of weekly "checkpoint" tasks for a project, based on its start and due dates. The number of tasks created is determined by the length of time between the dates.
Create Lists
First, we will create a list called Projects. Next, click on the Design button of the list to enter Ultimate Forms, then click on Form Designer.
Create a new form, then using the New Column button on the left create the following columns:
- Start Date - date column
- End Date - date column
- Tasks - Associated Items column. This specialized column type creates a parent-child relationship between two SharePoint lists.
Associated Items Column

Under Data source section, choose the option to create a new list. The list type should remain Custom list and the list title should be Tasks. Save the column and it will create a new Tasks list.
Drag the 3 new columns from the column gallery on the left onto the design canvas in the middle of the screen. Note how I'm using a container to place both dates on the same row.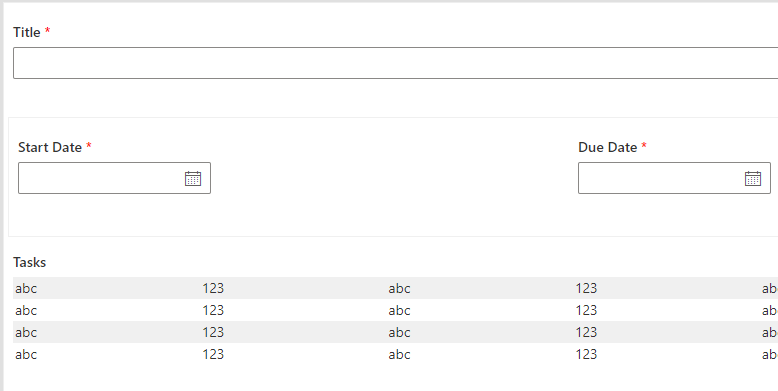
- Next, add Due Date column to the Tasks list.
Create Actions
Now we can start with the actions. First, create a new Create list items action. Remove all events from the first tab, then switch to Action tab.
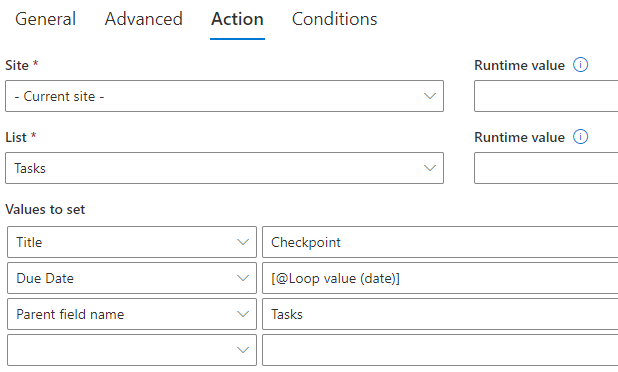
Here, change List value to Tasks (as that's where we are going to be creating the new items). Map Values to set. Note that at this point you cannot yet map Due Date, as the loop value is not configured yet. Just save and come back to it later. Note that I am setting Parent field name to Tasks. That is the name of the parent column in the parent list. Doing so will ask the action to establish a relationship between the two items.
Action Group
Now create a new Action Group. Action Groups help to execute several actions in one go. They also contain the ability to configure and execute loops.
Under Events on the first tab leave only New, switch to Action tab.
Add our Create action to the list of actions in the group (it is probably already selected, just click on the plus icon on the right). Once you do that, a new section will appear and you can now configure your loop settings.
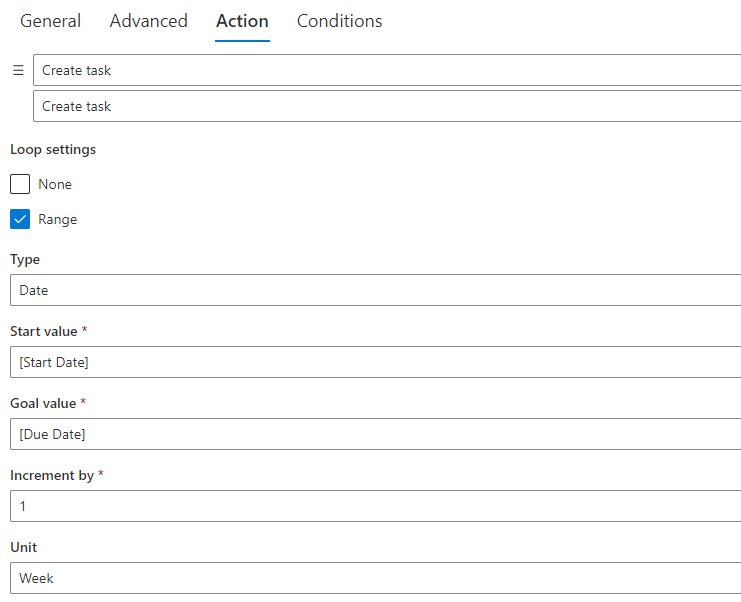
As you can see, I'm looping through the dates between Start Date and Due Date. That will execute the actions in the group for each weekly value.
Once the action is saved, go back to your Create action, you can now map the loop value to Due Date.
Testing and Results
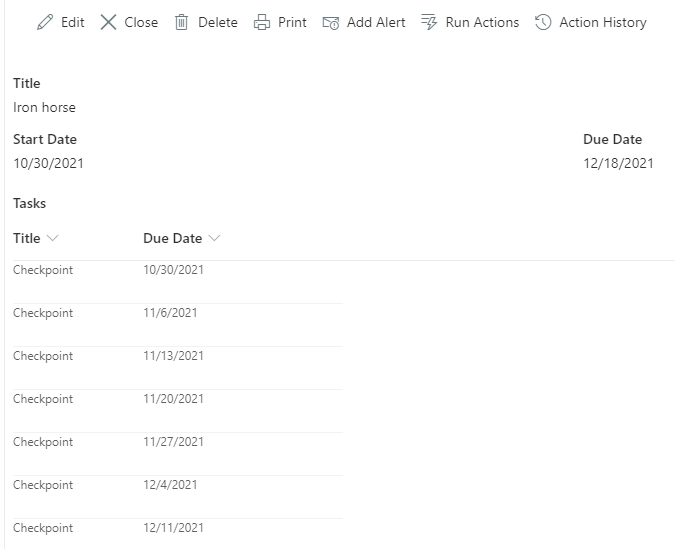
That's it! Now when you create a new project, it will automatically add a set of weekly tasks.
Conclusion
Loops in Actions make it easy to implement repeating actions for an interval in both dates and numbers.
There are probably numerous other scenarios where loops can be beneficial, explore and enjoy!