Use this option to synchronize Events from Microsoft Outlook 365 Calendar.
When you configure access for this data source type, you are required to create your own enterprise application and provide its settings in the web part data connection setup. The enterprise app is created on the tenant from which you are planning to show events. It can be any tenant, not necessarily your own, as long as you have administrative access to it.
Creating Enterprise App
- Log into the Azure AD administration site. You can access it from the general admin page or directly via URL: https://aad.portal.azure.com/.
- In the left menu, click on Azure Active Directory, then on App registrations.
- In the toolbar, click on New registration.
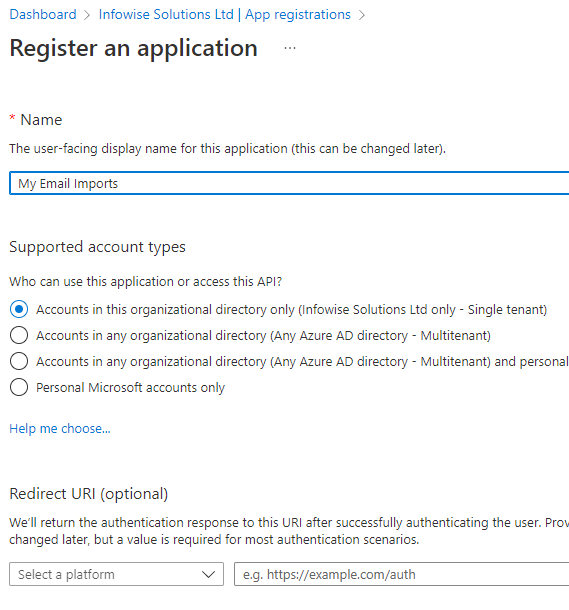
- Enter a meaningful name and click Register.
- Click on API permissions, then Add permission.
- Click on Microsoft Graph, then Application permissions.
- Scroll down to Calendars section and expand it.
- Check Calendars.Read permission. If you are planning to allow creation of events, check Calendars.ReadWrite instead (optional).
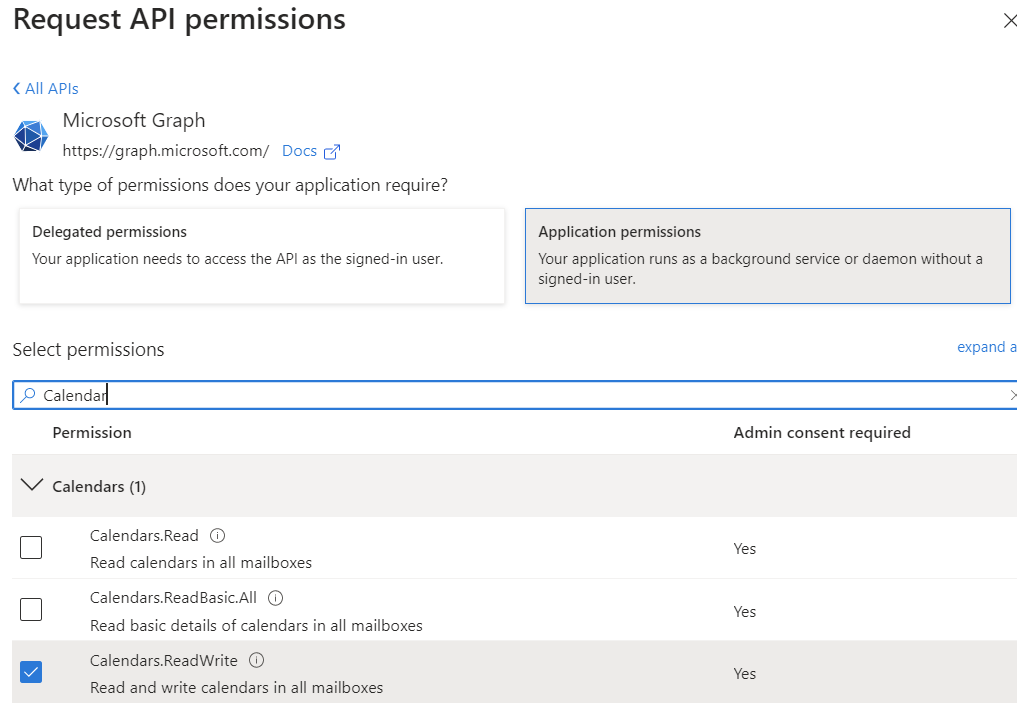
- Click on Add permissions at the bottom.
- Click on Grant admin consent to approve the permissions for the tenant. Application permissions are granted once and allow an application to gain access at any time, without user interaction.
- Click on Certificates and secrets to configure how the application is going to be accessed by Ultimate Forms. You can choose from two options:
- Certificates (recommended) - upload a certificate, which will then be configured in the import profile. Read more regarding configuring certificates in the next section below.
- Client secrets - similar to passwords, secrets are simpler to configure, but not as secure and will expire after a certain time period. Only recommended to use when the import needs to be run for up to 2 years. Make sure to store the secrets in a safe place and renew as required. Secrets will be shown only once upon creation.
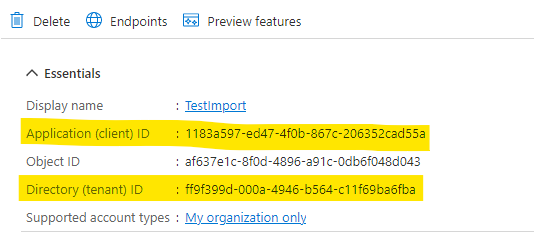
- Your enterprise app is now configured. Switch to Overview page and take a note of client and tenant IDs, we will use them later for configuring the import profile:
Creating Self-signed Certificate
NOTE: authenticating via a certificate is the recommended approach as, unlike secrets, certificate are not short-lived and need not to be frequently renewed.
You can use both self-signed and commercial certificates. Make sure your certificate contains both public and private key and is password-protected.
To create a self-signed certificate on Windows, search for PowerShell, right click and select Run as administrator. Enter the following lines, substituting the bold values with your own:
$date_now = Get-Date
$extended_date = $date_now.AddYears(25)
$cert = New-SelfSignedCertificate -certstorelocation cert:\localmachine\my -dnsname infowise_test -notafter $extended_date -KeySpec Signature
$pwd = ConvertTo-SecureString -String 'samplepwd' -Force -AsPlainText
$path = 'cert:\localMachine\my\' + $cert.thumbprint
Export-PfxCertificate -cert $path -FilePath c:\infowise_test.pfx -Password $pwd
Where:
- 25 - number of years the certificate will remain valid
- infowise_test - name of the certicate
- samplepwd - certificate password, up to 30 characters
- c:\infowise_test.pfx - export path
IMPORTANT: make sure you store the certificate and its password in a safe place.
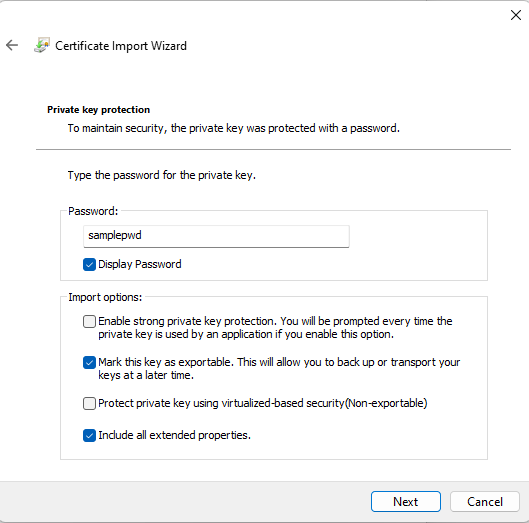
Next open the export folder and double-click the newly created certificate. It will start the import wizard. You can use the default values, except for the password:
Once the certificate is imported, you need to export it in .cer format. For that, search Windows for Manage user certificates, expand Personal, then Certificates. You should be able to find it here:

Right-click on the certificate, then All Tasks -> Export. It will start the export wizard. Leave all default values, only specifying the export location at the end. It will create a .cer file, containing the public key of the certificate.
Now we can upload the certificate to our enterprise app.
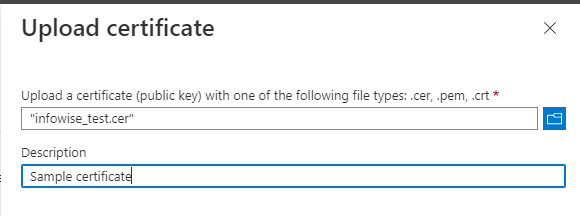
- On Certificate and client secrets page of the enterprise app, make sure to switch to Certificates tab, then click on Upload certificate.
- Select the .cer file we just exported and provide a meaningful name.
Once the certificate is uploaded to the enterprise app, it can be used by the Event calendar webpart.
Configuring Exchange online data source
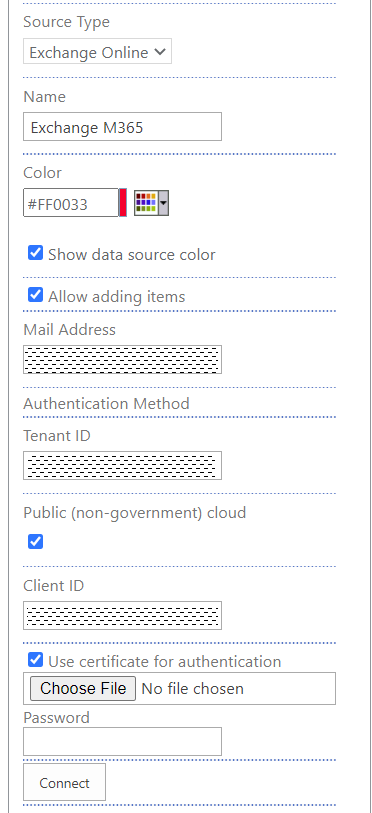
- Open web part settings tool pane and click New data source.
- Source Type: Select Exchange Online.
- Mail Address: type the mailbox from which to get events.
- Tenant ID and Client ID: copy from the enterprise app details.
- Public: Unless the mailbox is located on GCC High government cloud, leave checked.
- Choose to either use a certificate or a client secret.
- When using a certificate, upload the .pfx file and specify the certificate password.
- When using a client secret, provide it.
- Click on Connect to populate connection fields.
- Map the fields and click OK at the bottom.