Introduction
NOTE: The easiest way to create a relationship is by simply creating a new child list directly when creating a new Associated Items column. This way all the necessary configuration is done for you. This article deals with manual configuration options.
In this walkthrough, we will define the steps to create a Parent-Child Relationship with two lists. For the purpose of this document we will discuss this in generic terms, since we have already shown the different content types and usage scenarios in previous documents.
Parent-Child Relationship
The idea of a parent-child relationship to have two lists that are connected in a one-to-many association. One record holds some common information (e.g. Order form) and links that to a list of related subitems (e.g. Order Line Items).
To set up such a relationship, the following a needed
- Child list - holds the many records that will relate to one parent record.
- Parent list - the parent record that the child records point back to
- Associated Item column - allows for the creation of the child records from within the parent forms and defines the relationship
Defining the Associated Child List
When defining an associate child list there are 2 different ways to define them depending on your application use case.
- Using Associated Item/Document/Task content type
- Using a lookup column
The following guidelines will help you select the type of association according to your needs.
Entering Child Items Outside of the Parent Item
Your solution might require the ability to add new child items outside of the parent item form. In this case, choose the lookup column approach. The relationship is established by simply selecting the parent item[s] in the lookup.
The users will be able to create new child items independently of the parent and associated them either during creation or at a later time.
Using the Parent Form to Enter Child Items
Users open the parent item form to enter child items. For example, line items are added to an invoice. In this scenario, you can use both approaches. There is more information about the Usage Scenarios documentation.
Step-by-step Configuration
- Create a new list
- Go to list settings > Click on Advanced settings > Enable content type management and save
- Under Content type, click to add an existing content type
- Select Infowise under groups and then double-click Infowise Associated Item content type
- Save and return to list settings
- Click on Item content type and delete it from the list.
- The list should now contain only Associated Item content type and be set as default.
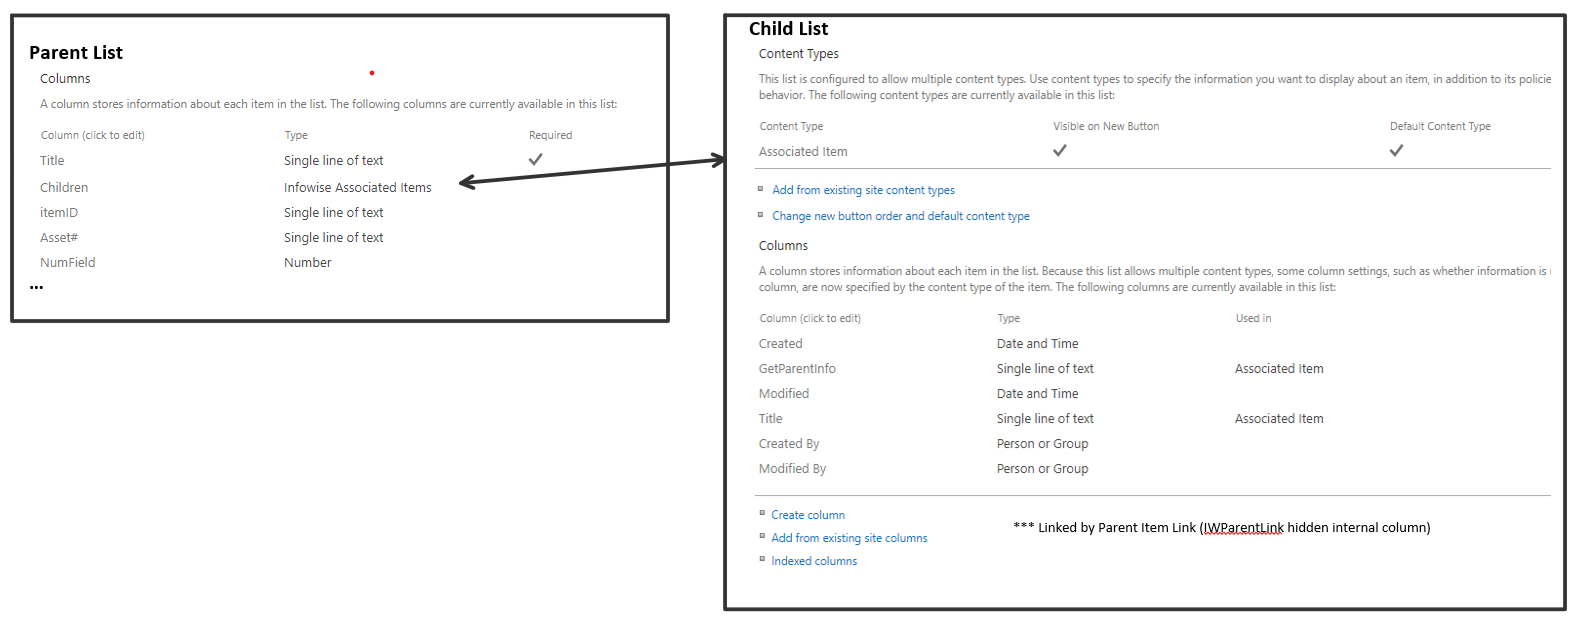
Note: the Infowise Associated content types contain a number of hidden built-in columns. These establish and maintain the parent-child relationship from the child records.
Defining the Parent list
You can create any type of list or document library. Next create an Associated Items column.
- Click on Design icon in list command bar
- Go into Associated Items columns
- Choose to add an Associated Items Column.
- Select the Associated Items List you just created as your Child list.
- All the other settings should be filled out automatically.
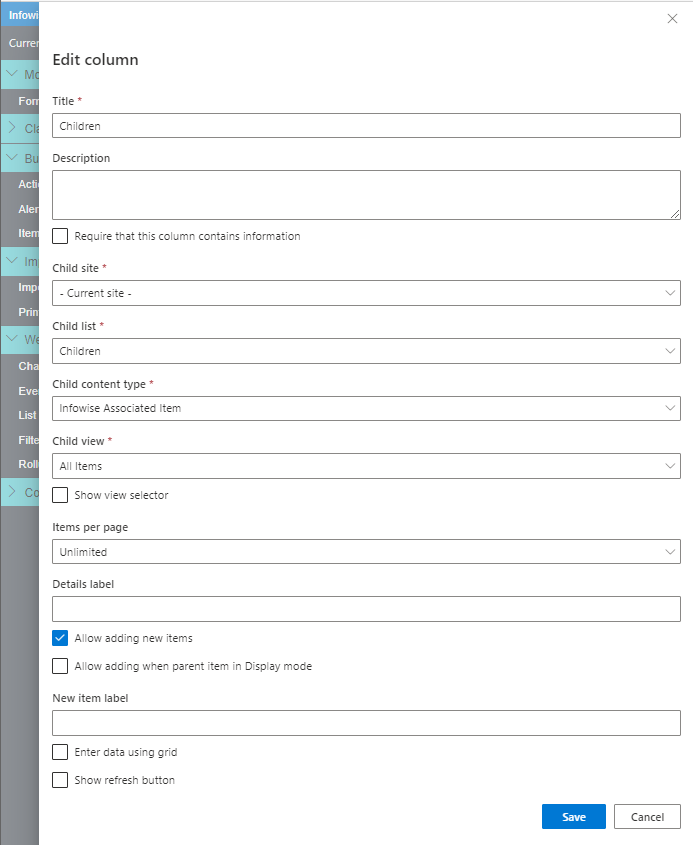
The following details are about the properties to configure the Associate Item Column on the parent.
- Child Site – select the site where your related list is located. This can be the current site or any other site of the site collection.
- Child list – list or document library storing the related items.
- Child Content type – if more than one content type exists in the list, select the appropriate one, otherwise no changes are required or possible.
- Child view – specifies the view of the child items list to display in the field. Using this setting you can define which fields will appear and in what order.
- Show view selector – allow users to dynamically switch views from the associate item field itself.
- Items per page –turn paging on and off and specify number of items per page.
- Details Label – the text to display for the link that will show the child records in the parent list view. Default is “Click of details”.
- Allow adding items – to display the child item generation controls on the item’s Edit form.
- Allow adding when parent item in Display mode - allow adding new related items even when the parent item is in Display form.
- New Item Label – the text to display for adding new child items. Default is “New Items”.
- Generate tasks automatically – (applies to On-Premise Associate Task only) enables automatic generation of tasks, based on content type, users/groups entered in the referred column and predefined task title and due date. This option is not available in the app version.
- Source column – (applies to On-Premise Associate Task only) column in the current list to pull the users/groups for task auto-generation.?This option is not available in the app version.
- Allow editing title – (applies to On-Premise Associate Task only) you can allow users enter their own task title or enter a preselected title for all tasks. In some cases, when you need to assign the same tasks to all users (e.g. Please review this document), it is easier not to enter the same title every time. You cannot enable title editing when using auto-generation. This option is not available in the app version.
- Default days to due date – (applies to On-Premise Associate Task only) default number of days between today and the default task due date. This option is not available in the app version.
- Enable due date editing – (applies to On-Premise Associate Task only) enable users modify due date. You cannot enable this option when using task auto-generation. This option is not available in the app version.
- Task managers – (applies to On-Premise Associate Task only) by default clicking on the item title opens the child item in display mode. From there the item can be edited or deleted.
- Target Folder Path - (applies to On-Premise Associate Document only) you can set this to define what folders these child documents will be saved too.
- Actions – (applies to On-Premise only) you can set up custom actions to be performed by users on all related items, such as delete or update. For more details refer to Actions section of this documentation. This option is not available in the O365 app version.
Next switch to Form Designer. Create and publish a new form, ensuring the Associated Items column is found on the form.
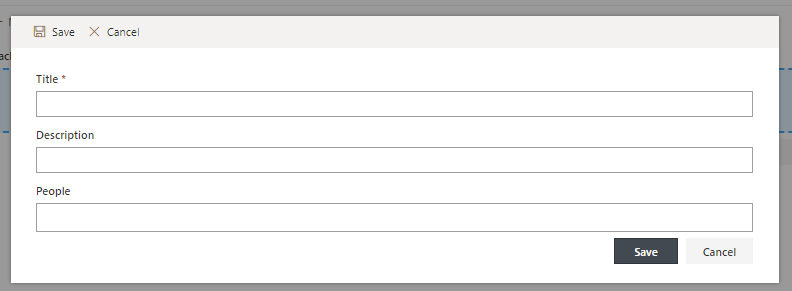
The Associated Item column can be configured to add/manage child items in several different ways. The most common and default configuration uses a pop-up form to add/edit child items.
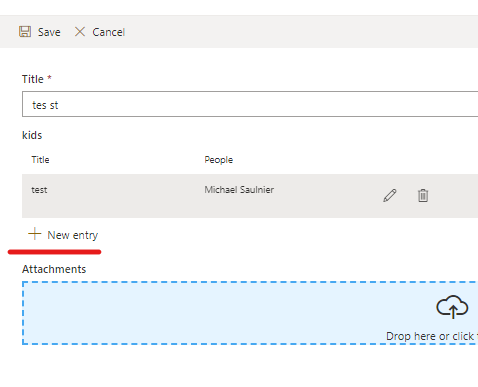
Clicking on New entry (or customized label) button brings up the child item form. This is either the default child list form or a specially designed form intended for the current Associated Items column.
Columns
By default, the grid view will display child list columns with their original titles. The width of each column is determined automatically based on column type and title length.
You can manually override both in the Associated Items column settings. You can additionally provide translations for the column titles. These will be automatically used in multilingual forms when the current user's default language is different from the default language of the form.