Creating a Rollups Profile in Microsoft 365
In this tutorial, you will learn how to create a Rollups profile in Microsoft 365.
The profile defines where Rollups will look for items and how those items will be displayed.
Before You Start
Before creating a Rollups profile, prepare a small set of lists that will be used as data sources.
For this tutorial, we use multiple lists with the same structure, which allows Rollups to aggregate items correctly and display them in a single view.
Prepare the following lists
Create three lists, for example:
- Projects – IT
- Projects – Marketing
- Projects – Finance
Each list should contain the same columns, such as:
- Title (Single line of text)
- Status (Choice: Not Started, In Progress, Completed)
- Start Date (Date)
- Owner (Person)
Add several items to each list so the Rollup results are easy to see, group, and page through.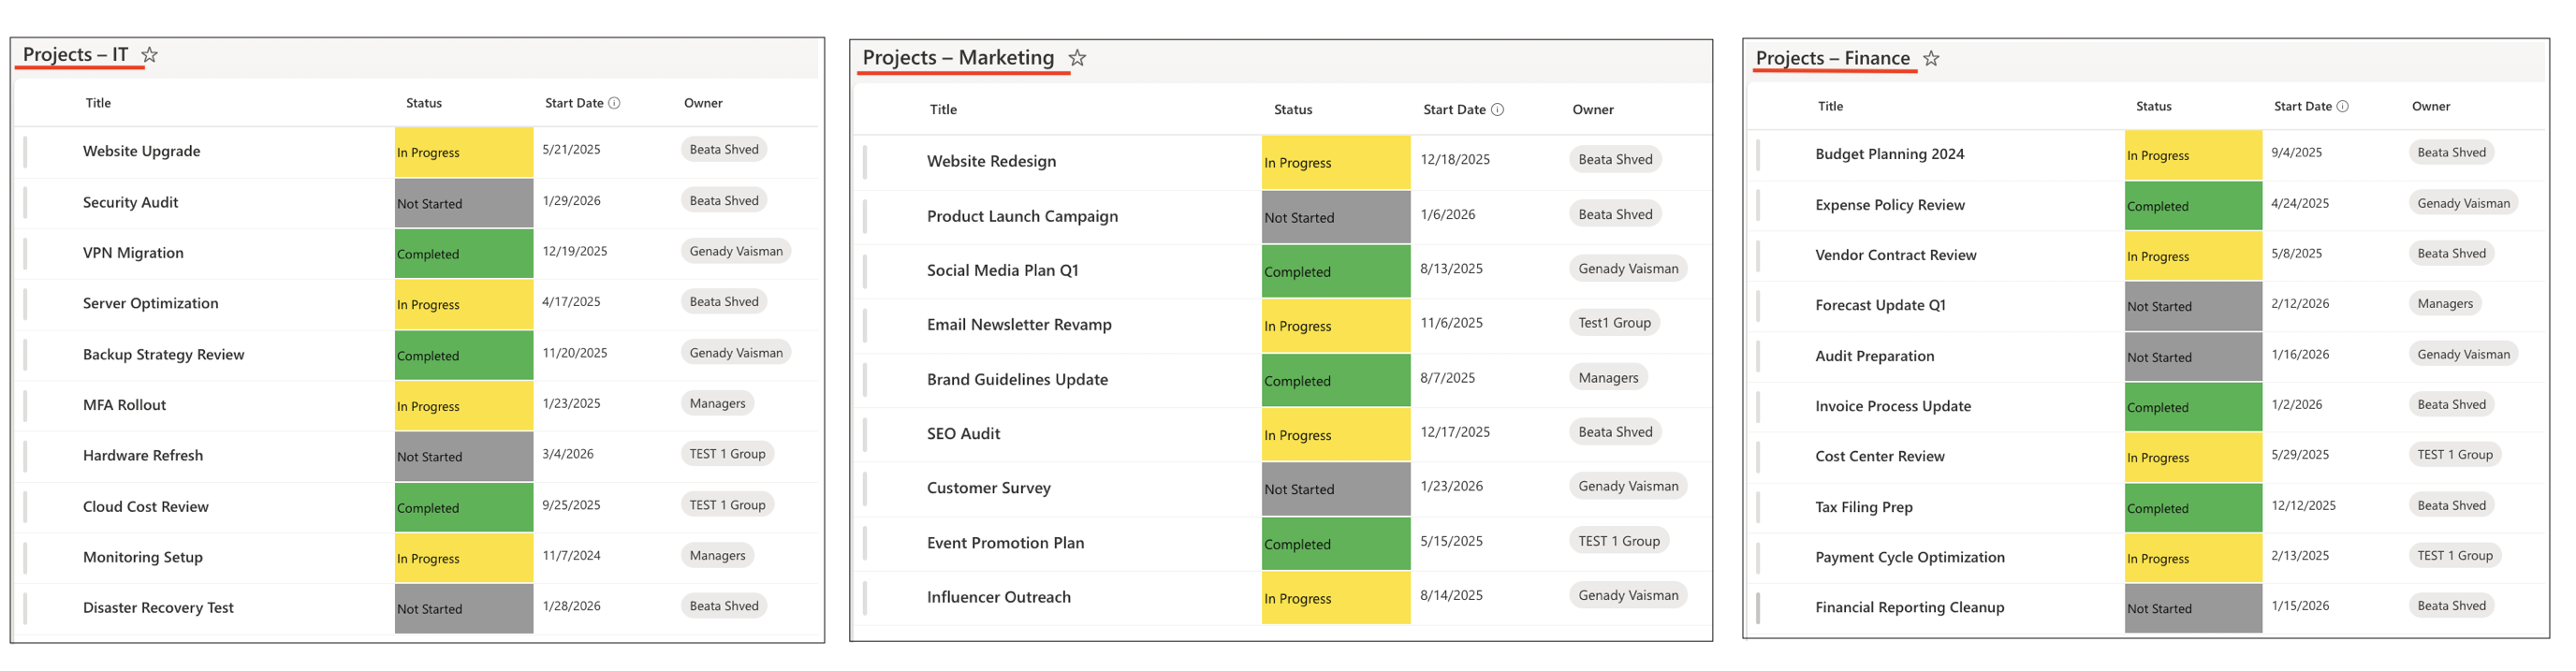
Instructions
Step 1: Open Rollups in Ultimate Forms.
- Open Design.
- In the left navigation, expand Web Parts.
- Select Rollups.
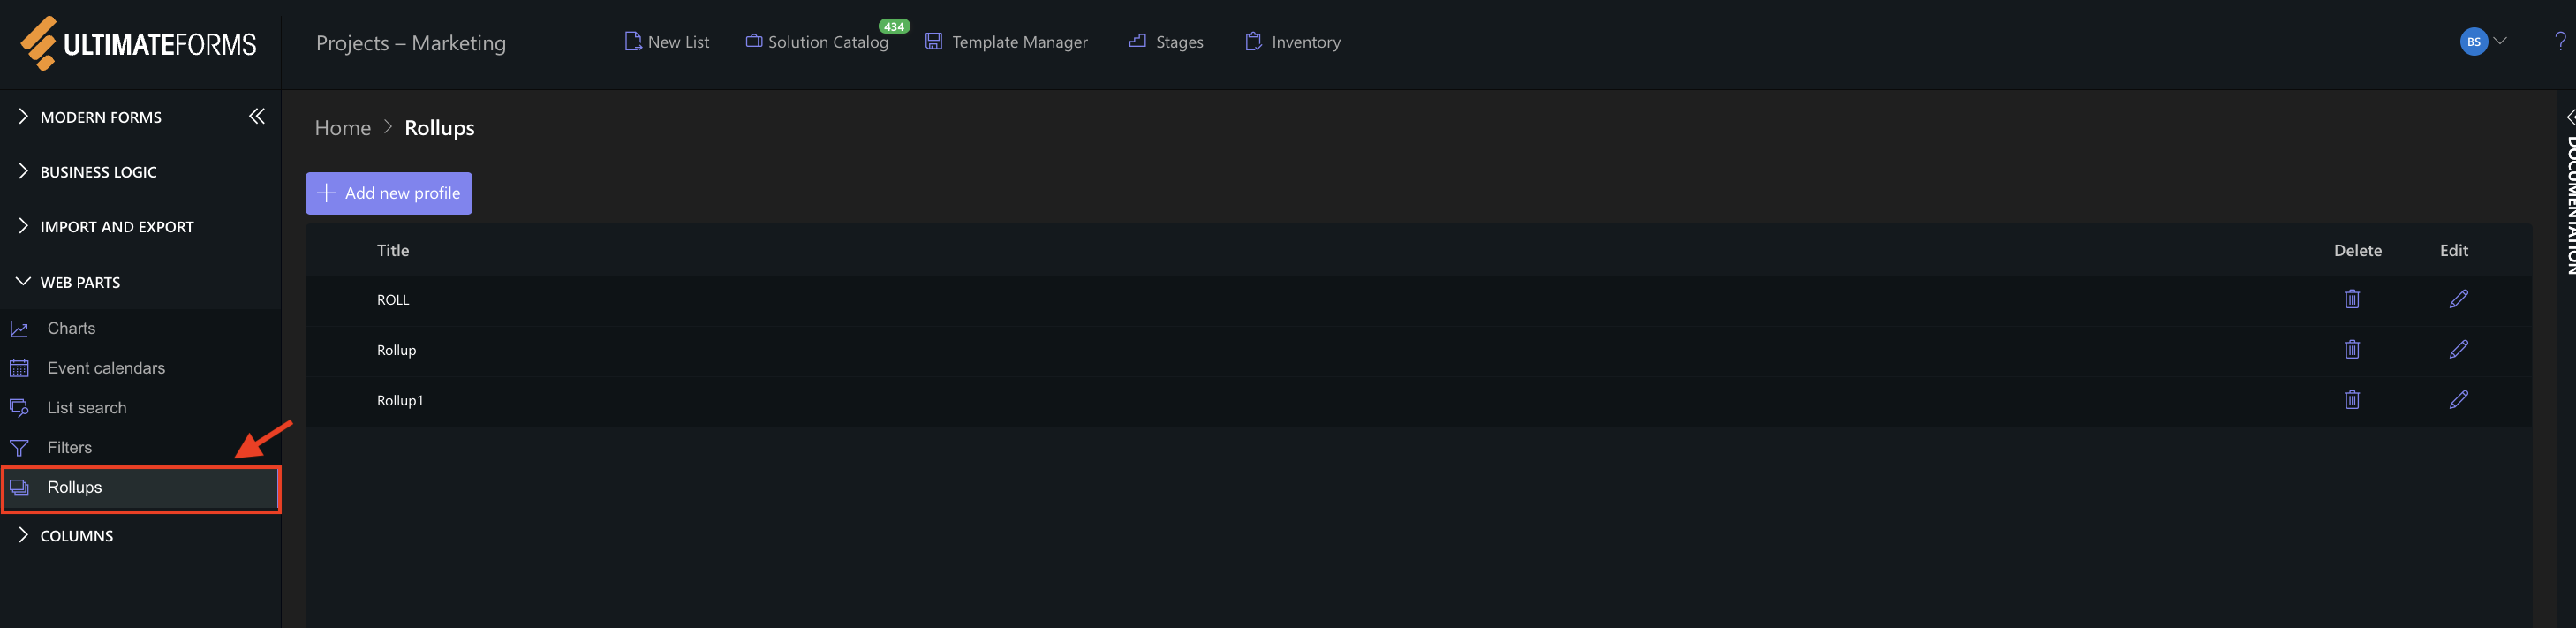
You will see a list of existing Rollups profiles and the Add new profile button.
Step 2: Create a New Rollups Profile
- Click Add new profile.
- The New profile panel opens with two main tabs:
- General
- Data sources
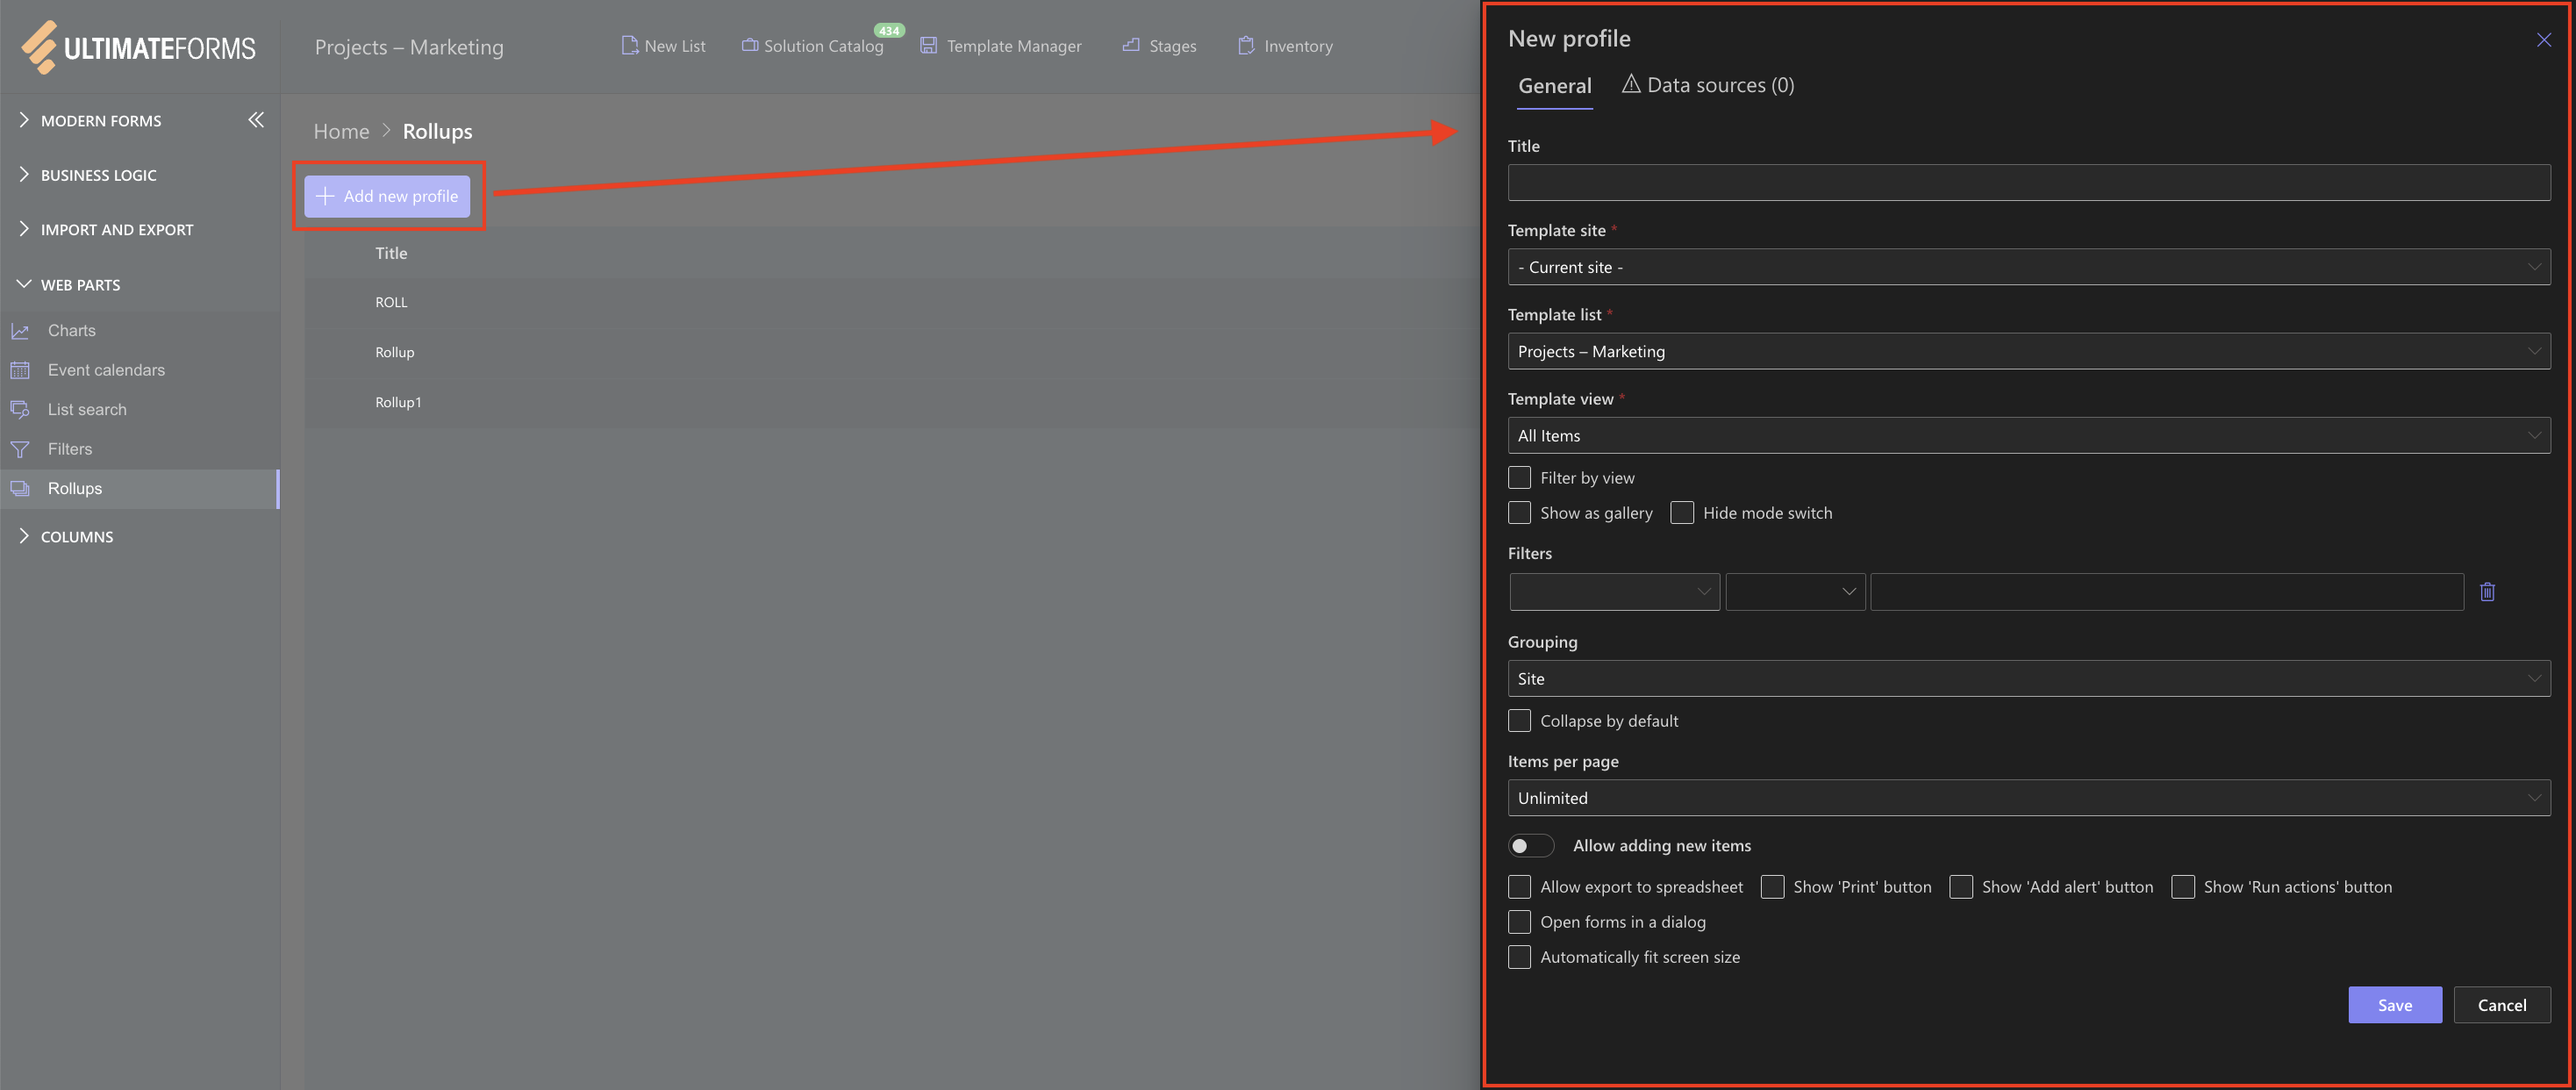
Start with the General tab.
Step 3: Configure General Settings
In the General tab, configure the basic profile settings.
- Title:
- Enter a clear and descriptive name for the profile.
Example: All Projects Rollup - This name will later be used when adding the Rollups web part to a page.
- Enter a clear and descriptive name for the profile.
- Template Site: Current site
- Template List:
- Select one of the project lists, for example: Projects – IT
- The template list defines how items will be displayed. All other lists included in the Rollup should contain the same columns.
- Template View
- Select the view that controls how items are displayed.
Example: All Items - Only columns included in this view will appear in the Rollup results.
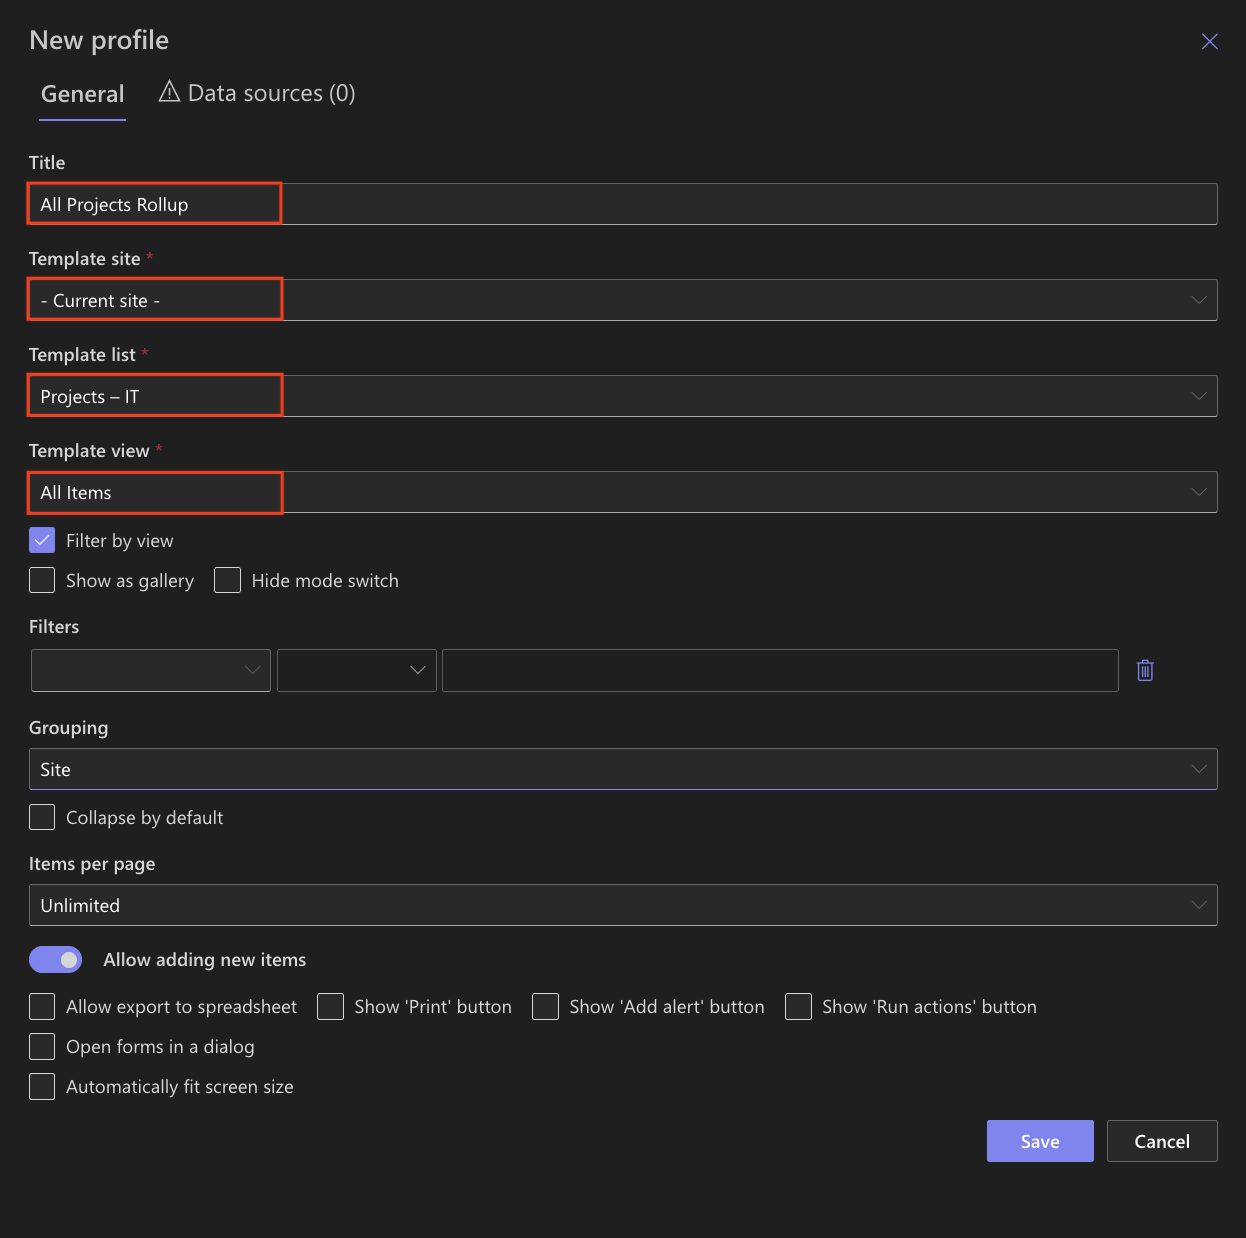
- Select the view that controls how items are displayed.
Step 4: Configure Filters and Display Options
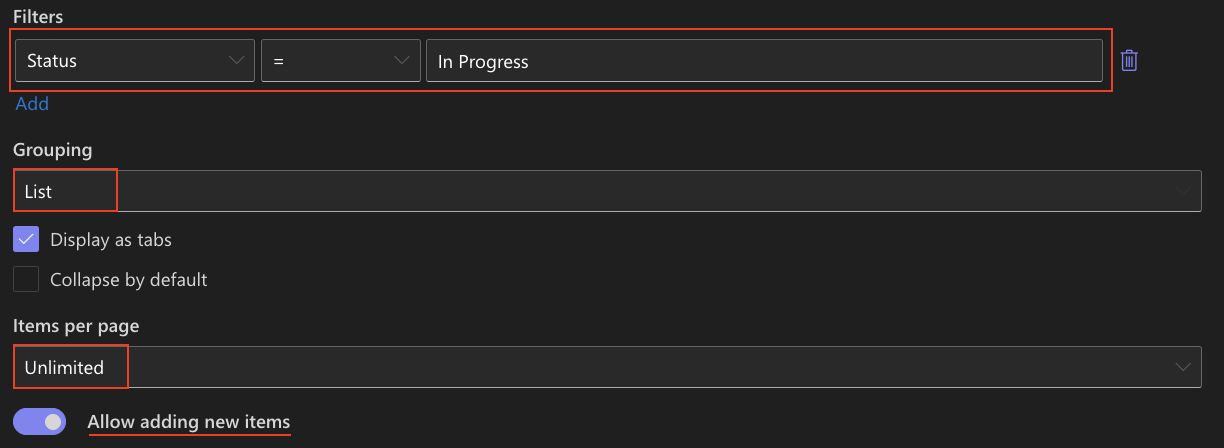
Filters:
Use Filters to limit which items appear in the Rollup.
For example, you can:
- include only items with Status = In Progress
- exclude completed projects
Filters affect which items are displayed but do not modify source lists.
Grouping:
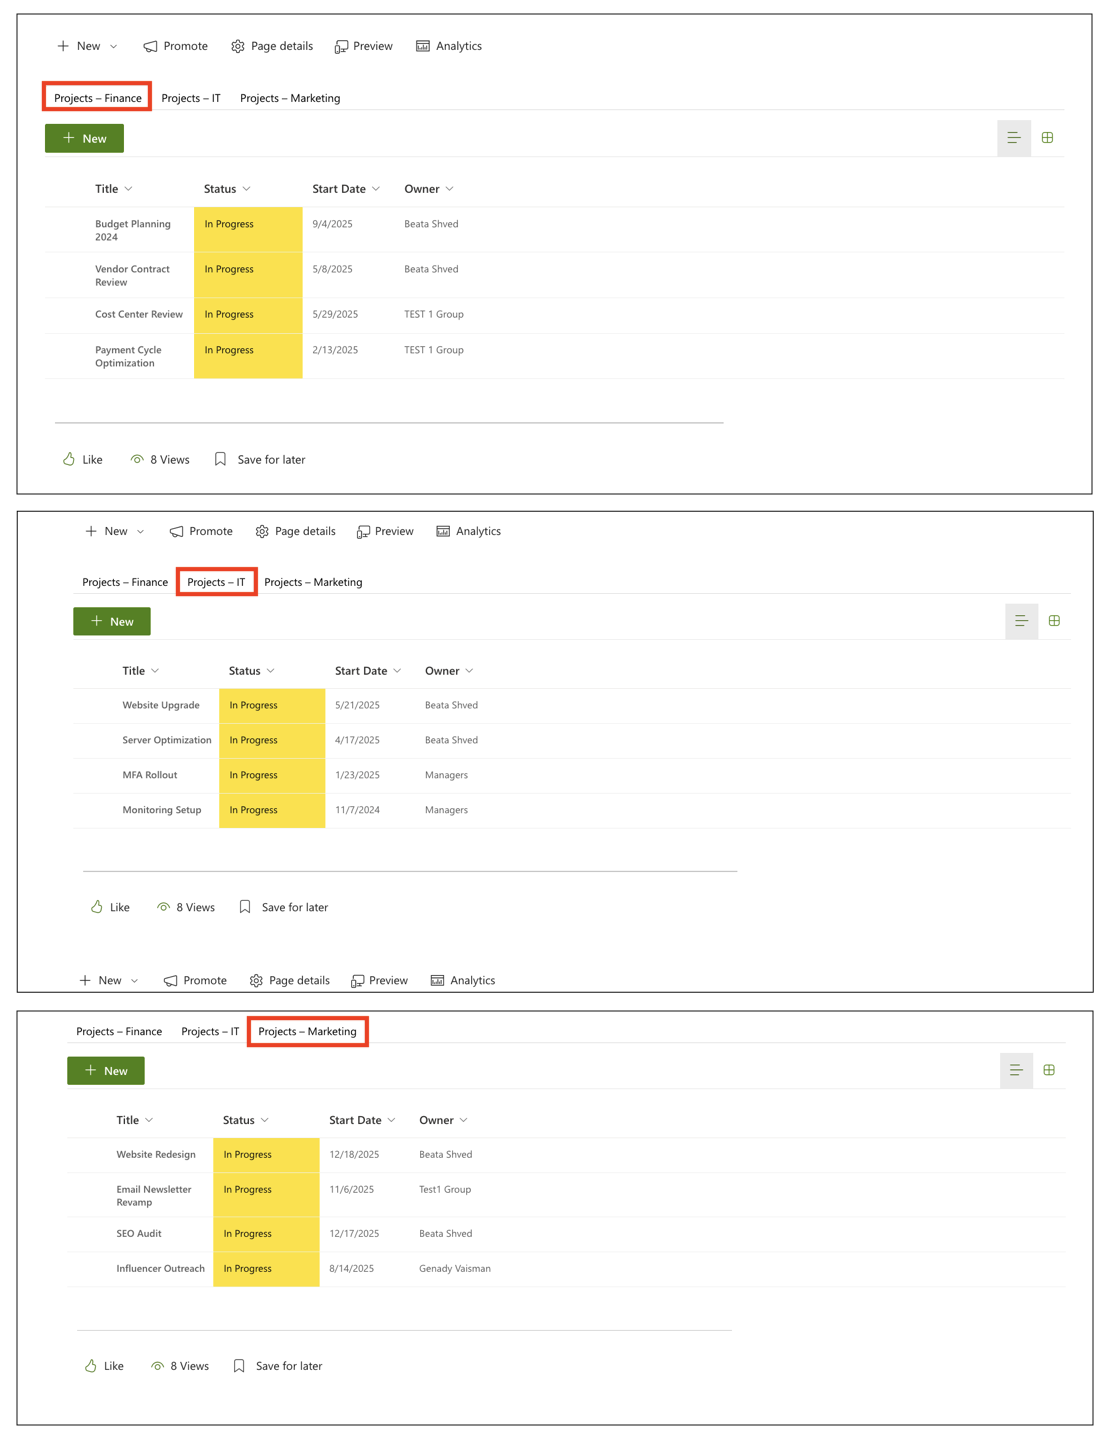
In this example, Rollups results are grouped by List.
- Grouping: List
- Display as tabs: Enabled
- Collapse by default: Optional
When grouping by List and enabling Display as tabs, each source list is displayed as a separate tab in the Rollups web part.
This makes it easy to:
- clearly distinguish items coming from different lists
- switch between lists without scrolling
- keep a clean and compact page layout
This approach works especially well when aggregating lists with the same structure, such as multiple project lists owned by different teams.
Items per Page:
Control paging behavior:
- Unlimited shows all items
- A fixed number enables paging
Step 5: Enable Interaction and Action Buttons
In the General tab, you can enable additional features that allow users to work with Rollup items directly.
Available options include:
- Allow export to spreadsheet – export Rollup results
- Show Print button – use Print Templates with Rollups
- Show Add alert button – create alerts directly from the Rollup
- Show Run actions button – run Automated Actions on items
- Open forms in a dialog – keep users on the same page
- Automatically fit screen size – adjust layout to page width

These options turn the Rollup into an interactive working view rather than a read-only list.
Step 6: Add Data Sources
Switch to the Data sources tab.
- Click Add data source.
- Configure the data source:
- Site: Current site
- Scope: Single site or Site collection
- Locate by: Specific Lists
- Lists: Choose lists you created: Project – IT, Project – Finance, Project - Marketing
This configuration explicitly defines which lists should be included in the Rollup and avoids pulling in unrelated lists.
- Click Save data source.
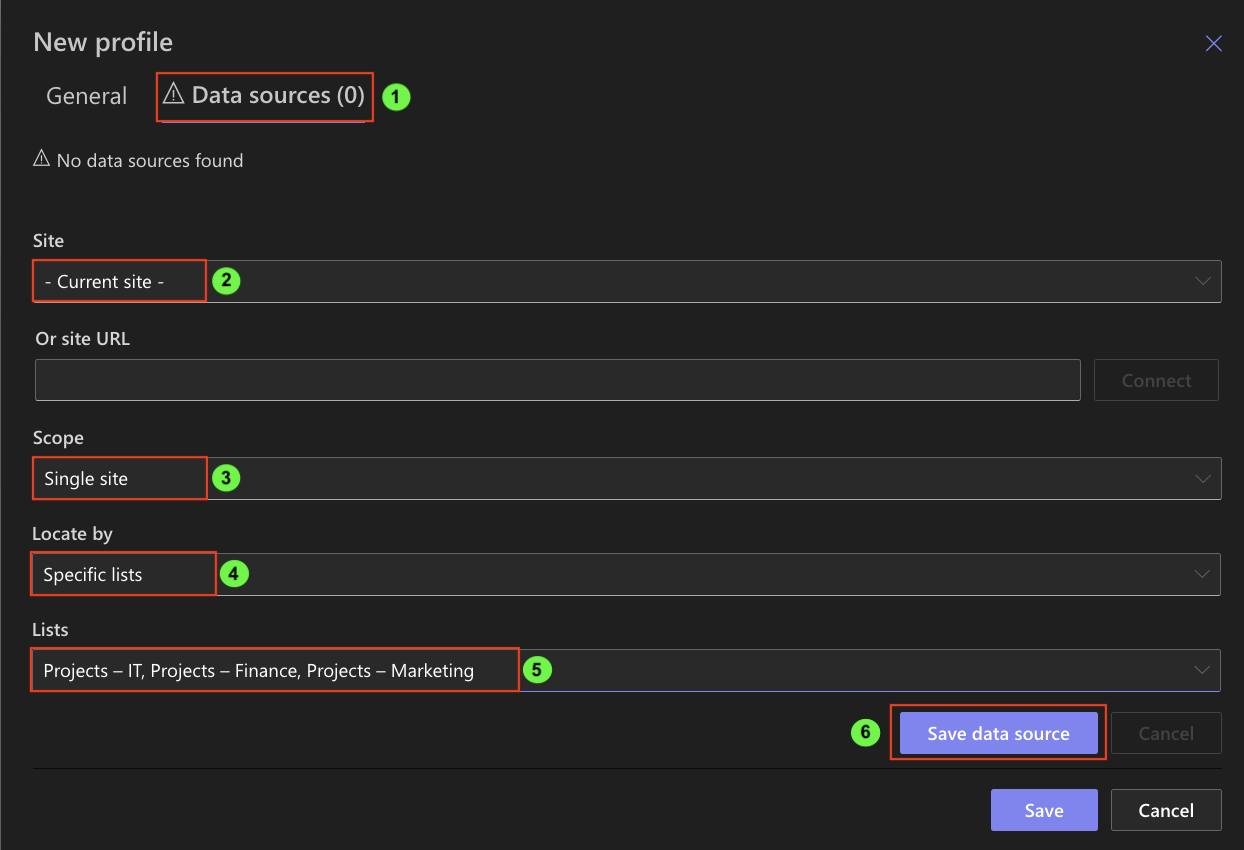
You can add multiple data sources if needed.
Step 7: Save the Profile
After completing the General and Data sources tabs, click Save.
The Rollups profile is now ready to use.
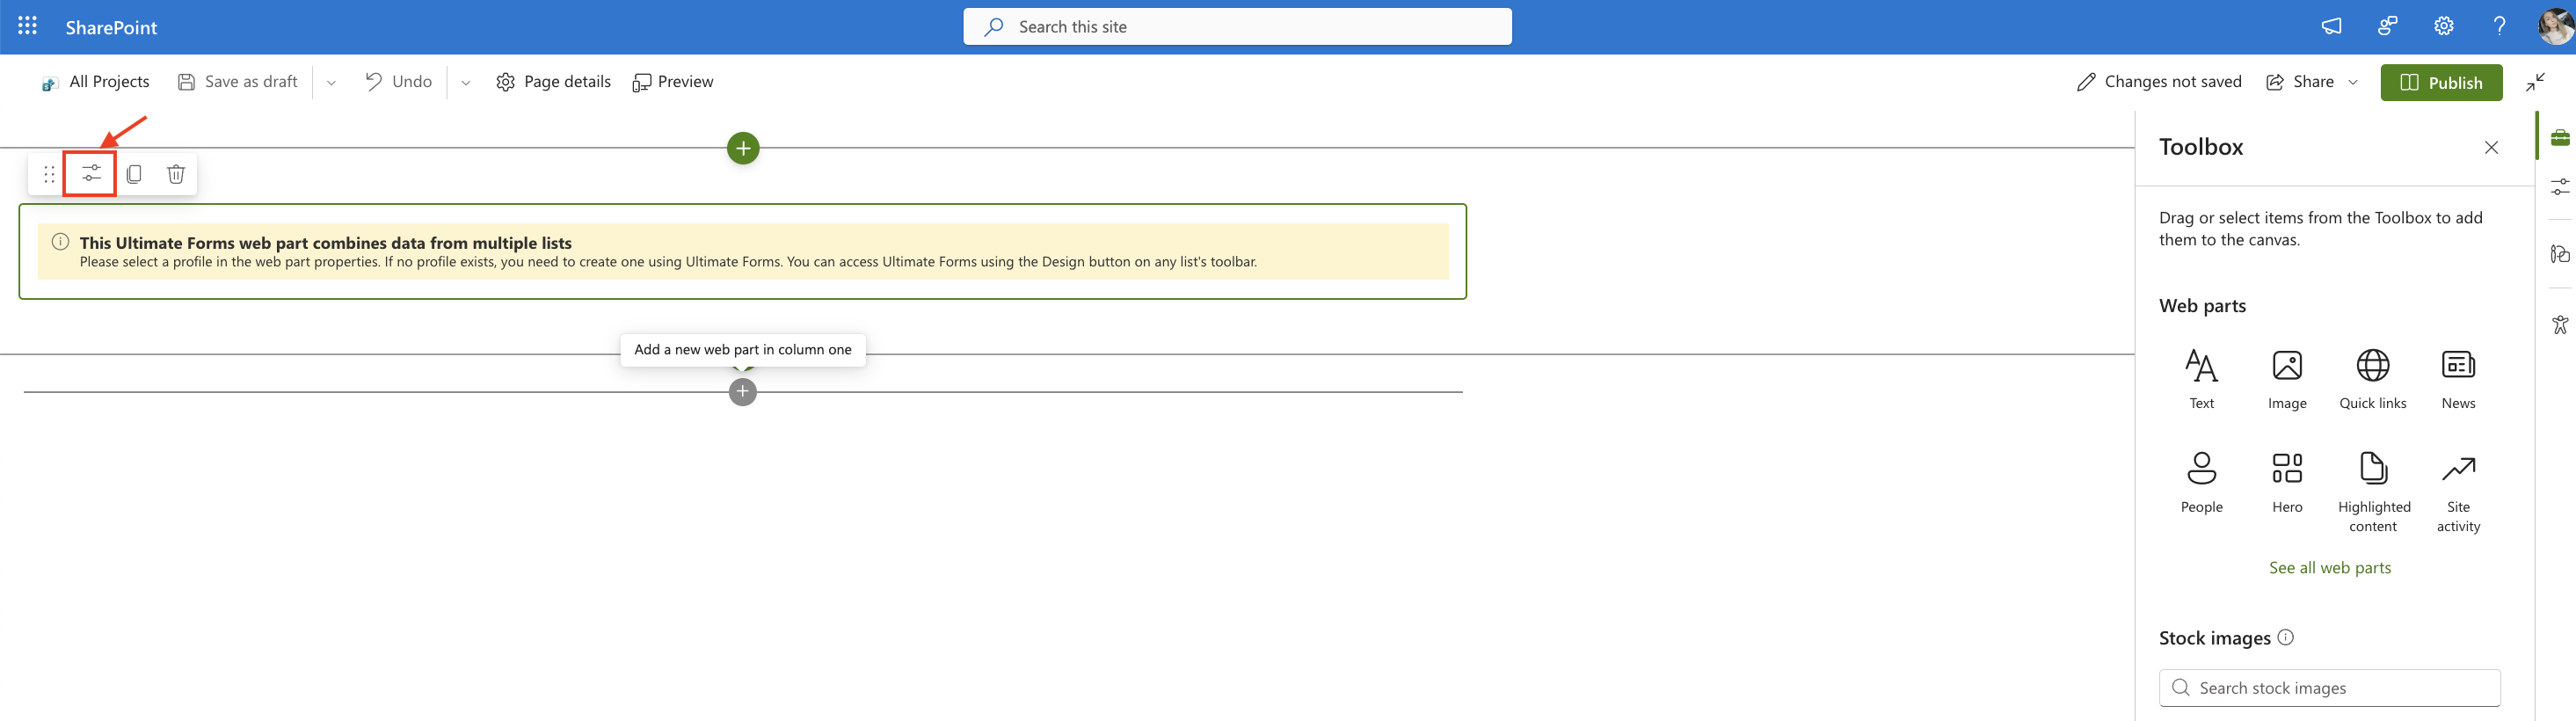
Step 8: Add the Rollups Web Part to a Page
- Open Setting.
- Click Add a page.

- Name – All Projects.
- Add the Rollups web part.

- Open the web part settings.
- Select the profile All Projects Rollup.
- Publish the page.
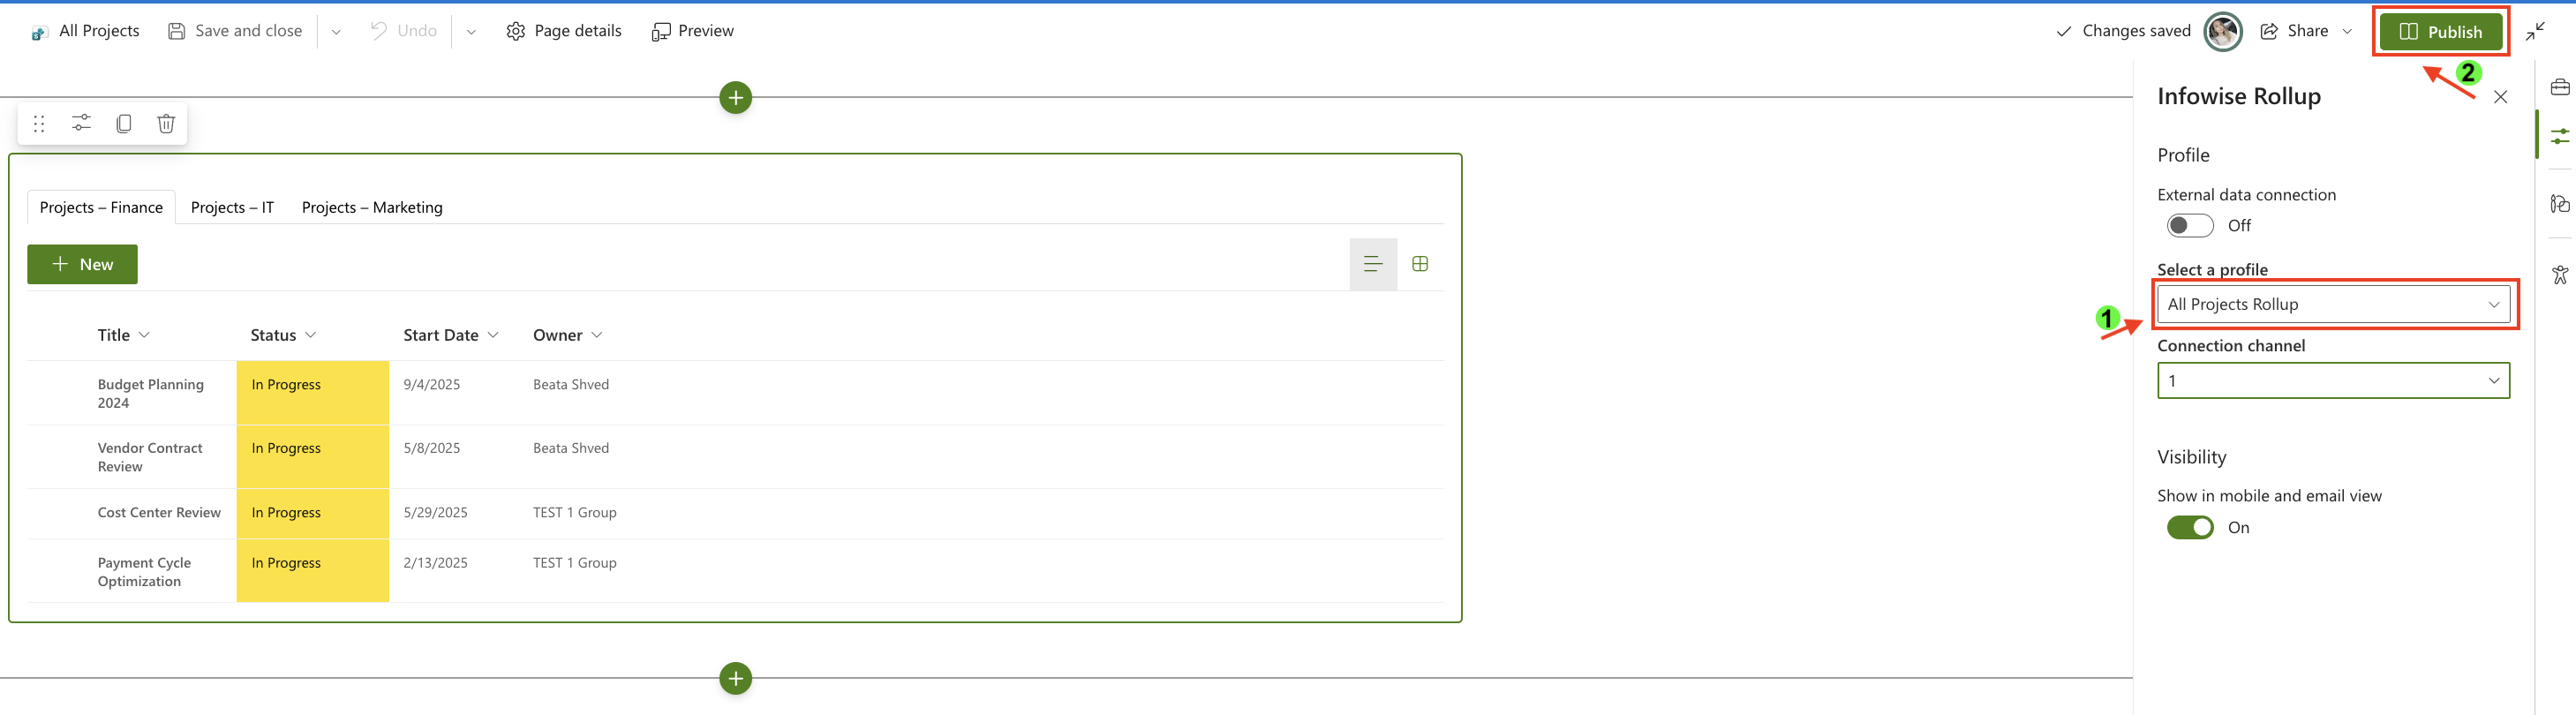
Step 9: See the Rollups in Action
After publishing the page, open the All Projects page to see the Rollups web part in action.
You can now:
- view projects from Projects – IT, Projects – Marketing, and Projects – Finance in a single Rollup
- see only projects with Status = In Progress, based on the configured filter
- switch between lists using tabs, with results grouped by list
- review items using a consistent layout defined by the template view
You can also interact with the displayed items directly:
- open forms in a dialog without leaving the page
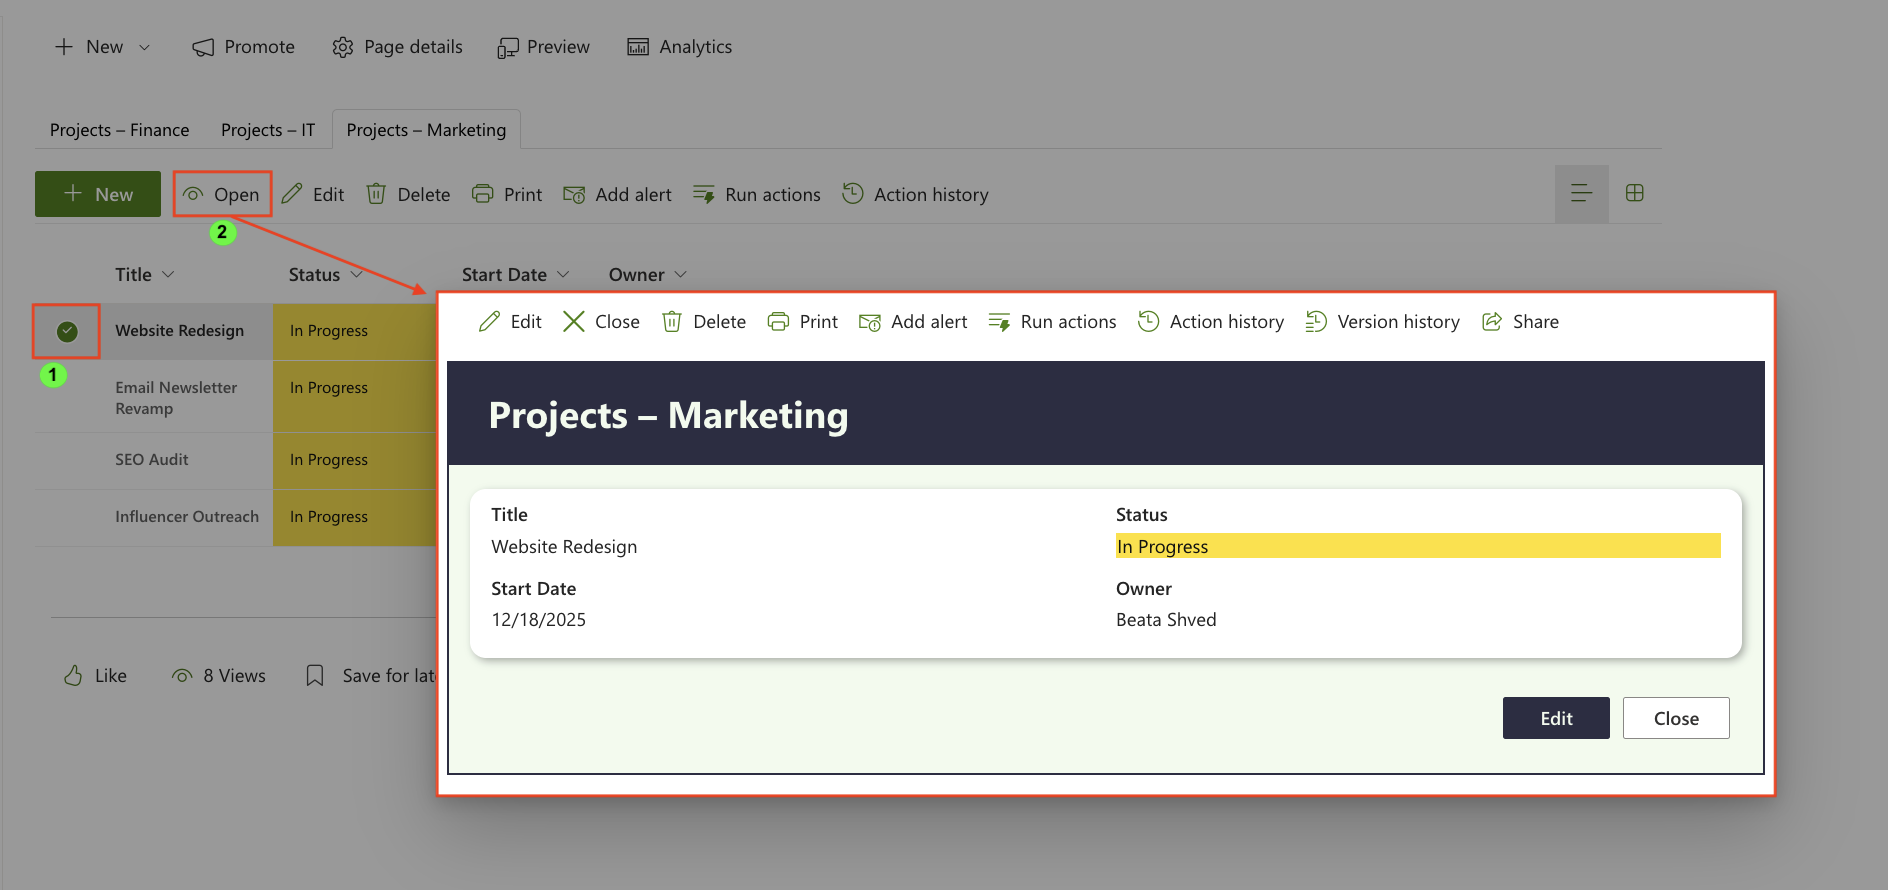
- print items using Print Templates
- create alerts for ongoing projects
- run Automated Actions on selected items
This allows you to work with active projects across multiple lists from one centralized page, without duplicating data or navigating between sites.
Summary
In this tutorial, you learned how to create a Rollups profile in Microsoft 365, aggregate items from multiple lists, apply a status-based filter, and display the results on a SharePoint page. You can now surface only relevant items—such as projects in progress—and work with them through tabs, dialogs, and built-in actions, all while keeping data in its original location.